Subsections of Get started with popular use cases

Acreto SASE+ Remote User Access Use Case Checklist and Deployment Guide

Goal

The shift to working from home and remote workforce has put never-before-seen stress on VPN solutions. The goal is to address the traditional bottlenecks of performance and upkeep of the hardware approach toward cloud-delivered security and connectivity. To accomplish this we will send all users to connect to benefit from the scale, availability, and security of Acreto SASE+Plus.

VPNs offer privacy but little else. Acreto SASE+ Plus replaces traditional VPNs with an offering that integrates connectivity, privacy, and security. It is globally available yet provides a local experience that is elegant, simple, and sustainable.

What do You Learn From This Use Case

In this use case, we would like to show you how easy is to shift your company to be able to work from home. With help of small articles we will guide you thru this process with a “step-by-step” procedure for:

  1. How to set up the basic configuration in Acreto WEDGE
  2. How to import and onboard Workers/Users into Acreto Ecosystem to allow them to work from anywhere with an additional layer of web security.
  3. How to connect your Datacenter or Branch offices to get access to your resources thru the ecosystem.
  4. How to add additional policies to create your own network traffic rules (with examples).
  5. How to verify connections and security or extend the solution.

Before You Start

  1. The narrative of the articles assumes that you know what Acreto is
  2. Definition of Ecosystem is clear.
  3. Understanding of procedures may require knowledge about network structure in your company and good knowledge about network addressing.
  4. We also assume that you already have an account on Acreto WEDGE - if not you can create one here.

Table of Contents

Subsections of Acreto SASE+ Remote User Access Use Case Checklist and Deployment Guide

Create Ecosystem and Import Users

Goal

The first goal to achieve is to import users to Acreto so that they can start working inside the ecosystem. We need to create the Ecosystem, connect Identity Provider, and onboard users with their devices - all steps have been described below.

Prerequisite

To complete this procedure you should:

  1. Have an active Acreto account (How to register)
  2. Have knowledge about Identity Provider (IDP) used in your company - the checklist placed below may be helpful to collect the required information.
  3. At last one test device (computer or phone) and access to account existing in IDP.

Checklist 1: Identity Provider (IDP)

  1. Select user authentication server and write down the following information
  2. Decide on the user authentication server / identity provider to user: Okta, Azure Active Directory, Windows Server AD, LDAP
  3. Domain name (yourcompany.com):__________________
  4. Address of Authentication server (IP or FQDN) :__________________
  5. Write down User Base DN, Group Base DN (i.e. ou=users, dc=dev-209171, dc=okta, dc=com) : __________________
  6. Username / Password to authenticate against Identity provider: /
  7. Decide on the list of initial 10 users to invite to participate in Acreto VPN solution if you like to take a phased approach

Configuration

In the context of our use case, we will use Microsoft Azure Active Directory with 10 Users and a sample Ecosystem.

To import and onboard Users:

  1. Log in to Acreto Wedge.
  2. Create a new Ecosystem named “remote users” or use existing ones.
  3. Integrate into your Identity Provider Service (Okta, on-premises windows active directory, Azure A/D)
    1. Connect identity provider with Acreto (configure here)
    2. Enable optional two-factor authentication on the 3rd party Identify provider. There may be an additional license required for this feature from your identity provider.
  4. Invite users in A/D to connect to Acreto SASE+
    1. Select users from the Active directory to receive onboarding emails or manually send the onboarding URL to end-users (see how: How to Invite a User with Onboarding Portal)
      1. Users visit an onboarding portal found at the bottom section of the identity provider page.
      2. They will be instructed to download the free OpenVPN client for mobile and laptops
      3. They will be instructed to download a unique Profile on Laptop/Mobile
      4. After the last step they can simply connect
    2. Acreto authenticates users against MSFT Azure A/D with MSFT Authenticator MFA and assigns all users to the “remote-user” role
  5. Add security Policy
    1. Add your first policy to turn on full Threat Detection (A/V, IPS, APT, Firewall, on all traffic on “remote-user” role (see how Create Security Policy )
    2. Confirm connectivity to the Internet and validate threat blocking by visiting http://Wicar.org and confirm all malware is blocked. You can also confirm Adult websites are also blocked.

Configure Datacenter

Goal

We already imported and secured our users - they able to connect to the Ecosystem. To meet the assumptions of the “Work from Anywhere” idea, it is necessary to provide users with access to the data center and internal services. For this purpose, we will connect the data center with the Ecosystem.

Prerequisite

To complete this procedure you should:

  1. Have an active Acreto account (How to regiester)
  2. Finish procedure described in previous article
  3. Know the Data Center in your company - checklists placed below may be helpful to collect the required information.

Choose Cinnectuin Method

For maximum flexibility Acreto offers three options to connect your datacenters and applications

  1. Use Acreto provided software virtual gateway (vGateway) installed on a KVM or ESX virtual machine
  2. Use your existing branch office equipment such as your existing Cisco router, or existing firewall
  3. For IoT/OT/Kiosks we provide the image for a 2 port IoT gateway (e.g. RaspberryPi)

Checklist 2: Datacenter Service Connection using vGateway

This checklist includes information to connect Acreto to your internal Datacenter for private application access

Acreto Virtual Gateway method behind datacenter Firewall:

  1. Select a machine to run Acreto vGateway (Virtual Appliance, i.e. Hyper-V, VMware ESXi, Proxmox, OpenStack)
  2. Confirm Machine has access to both WAN and DataCenter LAN (setup default gateway)
  3. Provide an IP address for vGateway for LAN (Local Network) connection: _ _ . _ . _ . _ _ / 24
  4. Provide a Gateway for vGateway for LAN (Local Network) connection: _ _ . _ . _ . _ _ / 32
  5. Provide an IP address for vGateway for WAN connection: _ _ . _ . _ . _ _ / 24
  6. Provide a Gateway for vGateway for WAN connection: _ _ . _ . _ . _ _ / 32
  7. Provide Network IP address and Netmask for all the networks you want to connect with Acreto: _ _ . _ . _ . _ _ / _ _ _

Checklist 3: Datacenter Service Connection and Branch using existing Firewall/VPN

This checklist includes information to connect Acreto to your internal Datacenter using the existing firewall/VPN gateway

  1. 3rd party Firewall/VPN in Datacenter for each branch location
  2. Confirm existing firewall/VPN/router supports IPSEC
  3. Have the login and password to your existing router or firewall handy: /_
  4. Have the manual for your existing firewall or router handy with how to build IPSEC tunnels
  5. Have the existing IP address for LAN (Local Network) connection: _ _ . _ . _ . _ _ / 24
  6. Provide a Gateway for way for LAN (Local Network) connection: _ _ . _ . _ . _ _ /24
  7. Repeat this process for each branch office location
  8. Select user authentication server and write down the following information
  9. Decide on the user authentication server / identity provider to user: Okta, Azure Active Directory, Windows Server AD, LDAP
  10. Domain name (yourcompany.com):__________________
  11. Address of Authentication server (IP or FQDN) :__________________
  12. Write down User Base DN, Group Base DN (i.e. ou=users, dc=dev-209171, dc=okta, dc=com) : __________________
  13. Username / Password to authenticate against Identity provider: /
  14. Decide on the list of initial 10 users to invite to participate in Acreto VPN solution if you like to take a phased approach

Configuration

Using the checklist above connect Acreto your Datacenters to Acreto via IPSEC (vGateway or existing HW). The below procedure shows how to do it using the Raspberry device as a vGateway.

It’s not the only method to reach the goal, other possibilities have been described here. As an alternative, you may use your existing branch office equipment such as your existing Cisco router, or existing firewall.

The following procedure is a summary of Linux - Automatic IPsec Configuration article - which you may want to ready if you want to know more.

To connect your Datacenter/Branch Office to Acreto:

Create new Gateway on Acreto WEDGE

  1. Log in to the Acreto Portal at wedge.acreto.net
  2. Select your ecosystem and go to Objects using the left menu.
  3. Click Add new Object and select Gateway.
  4. Fill at least: 1. Name: the name of the gateway 1. Category: IoT 1. vGateway make sure that in the right top corner Gateway is selected 1. DHCP/Static: Select DHCP 1. vGateway Local IP: IP address of RaspberryPi device in your LAN, i.e 192.168.200.1/24 1. Local Networks: - your local network addresses that should be routed through this gateway
  5. Save the created Gateway by pressing Add.
  6. Add a security policy that will allow communication from the Gateway device to the Internet.
  7. Commit pending changes (top of the screen)
Tip

To simplify testing, add IP addresses of all interfaces connected to your gateway as Local Networks (you can use /32 prefix for public interface). This will allow testing connectivity from the gateway through Acreto using ping, traceroute, and similar tools.

Note

To successfully test your connectivity, you also need to create a security policy that will allow traffic to go through your device.

Generate Raspberry Pi vGateway Image

To proceed with this step you should have at last one Gateway configured as vGateway in your Ecosystem. From the left menu choose Objects > Gateways to display the list of existing gateways.

To generate an image with the configuration for Raspberry Pi you need to:

  1. Click on the vGateway name, gear ⚙ icon, or “i” button on the vGateway panel - the details panel will appear.
  2. On the right side of the gateway details panel click on IoT Hardware Images images to show a list of options to generate images.
  3. The generation of the image may take a while, please be patient.
  4. When the image will be ready you may download it or copy the URL - save it on your PC.

Image installation

To proceed with this step you need to have an image file generated by Acreto or URL to the image for your vGateway.

To install the image we need to proceed with flashing the SD card.

  1. Download the write_image.sh script

    Click on the button and save the script in your home directory:

    Get write_image.sh

    or open the terminal and download the script using the command:

    wget https://kb.acreto.net/reference-material/downloads/write_image.sh
  2. Take your SD card from your Raspberry device

  3. Put your SD card into your computer

    • Ensure it didn’t mount automatically - if it did, unmount it
  4. Use write_image.sh script to write the image to SD card

    • if you have an image file downloaded locally:

      ./write_image.sh image-file.zip /dev/sdb
    • if you have want to use the URL of an image directly::

      ./write_image.sh https://aws1-vgateway-images.s3.amazonaws.com/vgateway-raspberry-pi4.s.nAH2xOL8HyJIK1g8v4HEsNCt.img.zip /dev/sdb

      where /dev/sdb is the location of your SD card

  5. Once finished, plug the SD card into your device and log in as:

    1. login: acreto
    2. password: acreto.io
  6. Change your password after the first login

  7. Test the network connectivity

    • IPsec status showing the tunnel status

      ipsec statusall
    • Traceroute to check if the traffic goes through Acreto Ecosystem

      traceroute 8.8.8.8

    More information about checking the connectivity can be found under Connectivity Check article where a dedicated tool is available.

Add Logging and Policies

Goal

For better cotroll you may connect Acreto to your internal Syslog Collector - all logs from event will be transferred there.

Based on the logs, you can extend the network rules, for example, those that block excessive network traffic (Youtube) or the application that are time eaters (Facebook)

Prerequisite

To complete this procedure you should:

  1. Have an active Acreto account (How to register).
  2. Finish procedure described in previous step.
  3. Have knowledge about Syslog used in your company.

Phase 3: Logging and additional policies

  1. Acreto supports external Syslog (optional)
    1. Configure Acreto with the IP address of your Syslog Collector for sending logs
  2. Lockdown access to Office365 and other SaaS applications.
    1. This feature relies on the capabilities of the SaaS vendor and uses an IP lockdown feature. For O365 is lockdown feature is called ‘conditional access.’ please follow this article for detailed instructions.
    2. Add additional security policies as per your organizational needs.
  3. Block YT/FB policy

Verify and Extend

Goal

[TODO]

Prerequisite

Phase 4 - Expand

Expand scope to all remote users and branches

Getting started with Acreto

Integration with DUO MFA

Before You Start

Overview

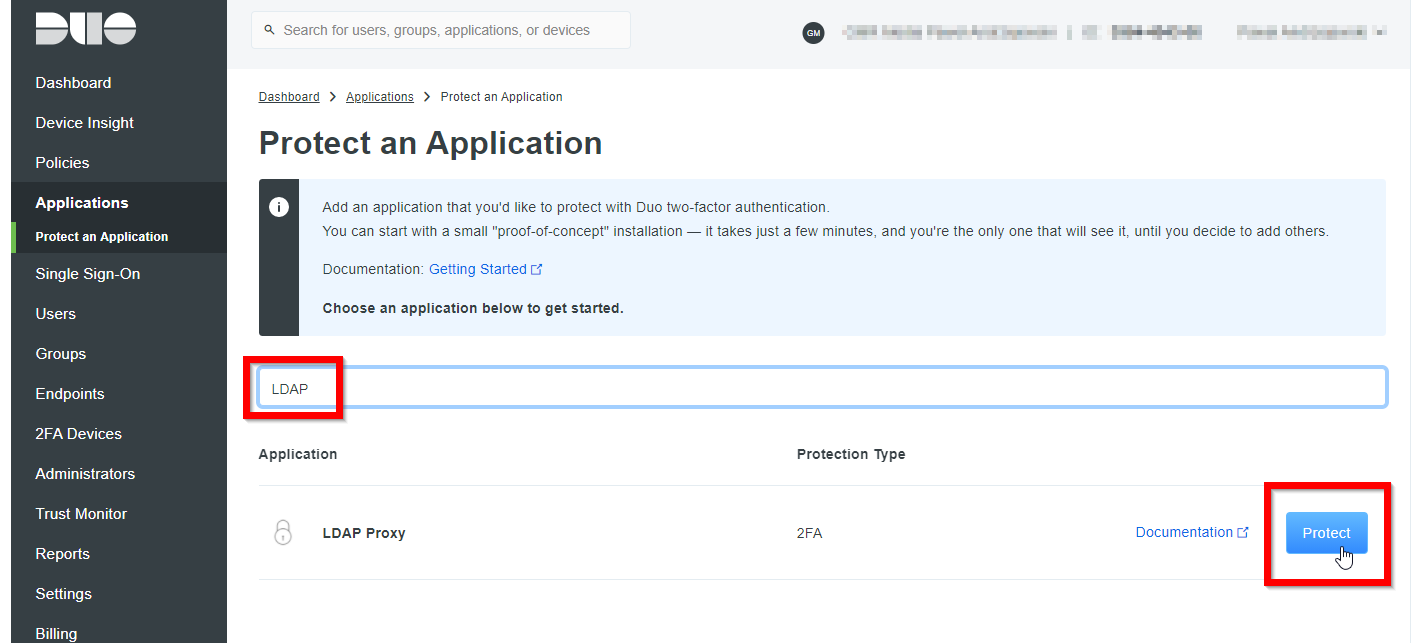
In this article, you’ll learn how to integrate DUO with an Acreto Ecosystem.

This process involves the following steps:

  1. Configuration of DUO
  2. Install the Duo Authentication Proxy
  3. Configure Identity provider in WEDGE

Prerequisites

To integrate Acreto with DUO, you will need the following:

  1. Active Acreto Ecosystem
  2. DUO account - use the existing one or create a new one (you may use the free trial option).
  3. A physical or virtual host for DUO Authentication Proxy - t’s not recommended to install the Duo Authentication Proxy on the same Windows server that acts as your Active Directory domain or Network Policy Server (NPS) role. This may create conflicts between the Duo service and your pre-existing services.
  4. Existing Identity provider with LDAP functionality. For example, the free LDAP JumpCloud will be used.

The Purpose of DUO Integration

A DUO integration allows your Acreto Ecosystem to utilize the user credentials stored in your LDAP Identity Provider to connect to the Ecosystem using Acreto TLS Client with additional Multi-Factor Authentication made by the DUO application, phone, or SMS.

It uses DUO Authentication Proxy as the “Man in the middle” that additionally secures the login procedure for Acreto users.

The solution uses an LDAP connection from Acreto to DUO and from DUO to Identity Provider LDAP.

How To

Configuration of DUO

To configure your DUO to work with Acreto, please:

  1. Log in to the DUO admin panel.
  2. From the left menu choose the Applications option.
  3. Use the search option, and type LDAP. The list of apps should be filtered to only one position LDAP Proxy.
  4. Click on the Protect button for the LDAP Proxy option.
  5. On top of the LDAP Proxy configuration screen, you will get three essential values that need to be noted: Integration key, Secret key, and API hostname.
  6. After scrolling the screen, you will see additional settings. Fill the Name field with its value, which will be displayed for users on the authorization screen.
  7. Scroll to the bottom of the screen and click on the Save button.

Install the Duo Authentication Proxy

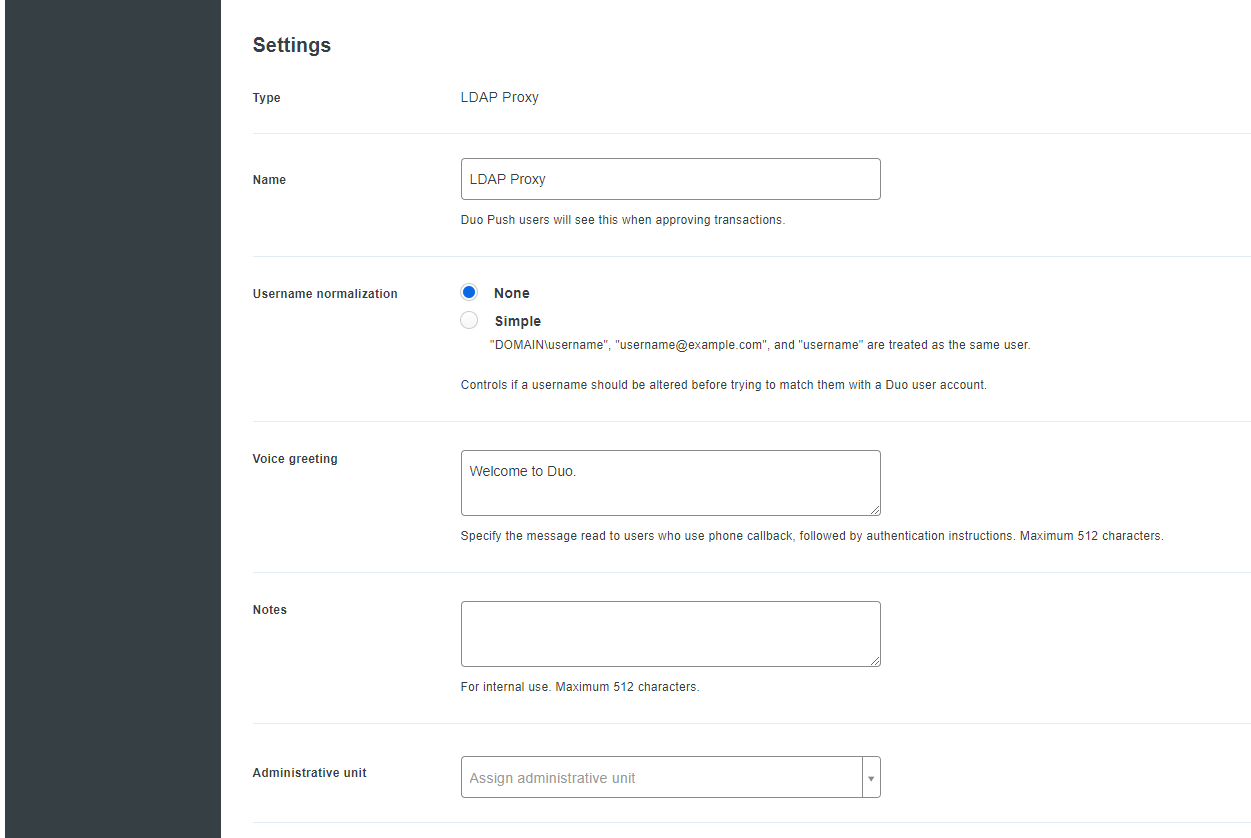
To install the Duo Authentication Proxy, you will need the host with Windows. The procedure for the Linux host may be found on the official DUO documentation.

  1. Log in to your Windows machine.
  2. Download the latest version of DUO Proxy for Windows https://dl.duosecurity.com/duoauthproxy-latest.exe
  3. Run the downloaded installer as a User with administrator privileges and install the proxy.
  4. When the installation is done, configure the proxy by editing the file: C:\Program Files\Duo Security Authentication Proxy\conf\authproxy.cfg
  5. Fill in the ad_client section to configure LDAP/ActiveDirectory connection:
    1. host - The IP/hostname of LDAP/ActiveDirectory service.
    2. service_account_username - The username of a domain account that has permission to bind to your directory and perform searches. We recommend creating a service account that has read-only access.
    3. service_account_password - The password corresponding to service_account_username.
    4. search_dn - The LDAP distinguished name (DN) of an Active Directory container or organizational unit (OU) containing all of the users you wish to permit to log in. For example search_dn=DC=example,DC=com
  6. Fill the ldap_server_auto section to configure DUO Authentication Proxy as the LDAP server:
    1. ikey - Your integration key that you did get in the DUO configuration step.
    2. skey - Your secret key that you did get in the DUO configuration step
    3. api_host - Your API hostname (i.e. api-XXXXXXXX.duosecurity.com) that you did get in the DUO configuration step
    4. client - The mechanism that the Authentication Proxy should use to perform primary authentication. This should correspond with a “client” section elsewhere in the config file. In this case, when only one client is configured, use the ad_client
      Warning

      ad_client - Use Active Directory for primary authentication. Make sure you have a [ad_client] section configured. Neither [radius_client] nor [duo_only_client] are valid for use with [ldap_server_auto]. This parameter is optional if you only have one “ad_client” section. If you have multiple, each “server” section should specify which “client” to use.

    5. Make sure the config file is similar to following:
      [ad_client]
      host=ldap.jumpcloud.com
      service_account_username=xxxxxx
      service_account_password=xxxxxxxxxxxx
      search_dn=ou=Users,o=xxxxxxxxxxxxxxxx,dc=jumpcloud,dc=com
      auth_type=plain
      bind_dn=uid=search,ou=Users,o=xxxxxxxxxxxxxxxx,dc=jumpcloud,dc=com
      
      [ldap_server_auto]
      ikey=DIxxxxxxxxxxxxxxxxxx
      skey=xxxxxxxxxxxxxxxxxxxxxxxxxxxxxxxxxxxxxxxx
      api_host=api-xxxxxx.duosecurity.com
      failmode=safe
      client=ad_client
      port=1812 ; comment if you want to use the default LDAP port
      failmode=safe
      ssl_key_path=ldap_server.key
      ssl_cert_path=ldap_server.pem
    6. Save and close the configuration file.
    7. Start the DUO Authentication Proxy /opt/duoauthproxy/bin/authproxyctl start
    8. Ensure that DUO Authentication Proxy is running /opt/duoauthproxy/bin/authproxyctl status

Configure Identity provider in WEDGE

Configure Wedge to use DUO Authentication Proxy as the Identity Provider. If you want to know more about IdP, read this article.

  1. Log in to Acreto WEDGE
  2. From the left menu, choose Objects > Identity Providers
  3. Click on the Add new + button.
  4. Fill the form with proper values:
    1. Name - the representative name of the Idp - e.g., DUO LDAP
    2. Description - infromative description of IDP - e.g. DUO Authentication Proxy
    3. Identity Provider Type - choose LDAP
    4. Host - set the LDAP server to the IP address or hostname of your Duo authentication proxy
    5. Port - set the LDAP server port to 636 to secure the connection with SSL.
    6. Username - the name of the user that has been used for the DUO Authentication Proxy configuration.
    7. Password - the same password that has been used for the DUO Authentication Proxy configuration.
    8. User Base DN - Proper DN config.
  5. Save & commit

Summary

Thanks to Acreto and Multi-Factor Authentication, the administrator can force users to use multi-factor logging, increasing the organization’s security level.

Connecting Branch office and Secure Site-to-Site VPN

Simple on-demand connectivity of multiple organizational sites in, hub and spoke, mesh or any other combination.

Always start each section with a network diagram Talk about how to use vGateway Talk about options people have to install our vGateway on an X86 device. E.g. they can buy this box and install our VM.

IOT / OT onboarding

IOT / OT onboarding

Network diagram of an ATM machine with Raspberry PI Explain the concept that the device will connect the Raspberry Pi to the SASE service

Reflection NAT

Introduction

This document describes how to configure Reflection NAT. Reflection NAT is a mechanism that allows you to secure any Internet Site using the Acreto Platform. Technically, to achieve this, we need to:

  1. Let the user redirect the traffic to the Acreto-allocated IP address by setting correct DNS records,
  2. On the Acreto side the traffic headers sent by the user are modified:
  3. The source IP address is changed to Acreto-allocated IP address
  4. The destination IP address is changed to the Internet site’s IP address
  5. On the Internet Site side all the incoming traffic is firewalled, with the exception of what comes from the Acreto-allocated IP address.

You can find more about this technique on the Internet, for example at http://www.nycnetworkers.com/real-world/nat-reflectionnat-loopbacknat-hairpinning/

Securing website scenario

In this example, we will protect the website http://kb.acreto.net, hosted on a server with IP 52.216.94.210. In order to achieve this, we will do the following:

Configuration of Acreto Platform

Create Address object for remote Server / Application to be Protected

  1. Log in to Acreto Platform at https://wedge.acreto.net
  2. Go to Elements > Objects and click Add new object
  3. Select Address
  4. Fill fields:
    1. Name - kb.acreto.net Server
    2. Address - 52.216.94.210
    3. Category - Application
  5. Press “Save”

Allocate IP address for remote Server / Application to be Protected

  1. Go to Elements > Objects and click Add new object
  2. Select Allocated IP
  3. Fill fields:
    1. Name - kb.acreto.net Public IP
  4. Press “Save”

Create Reflection NAT Rule

  1. Go to Policies > Address Translation
  2. Press “Add New Translation Policy”
  3. Fill the fields:
    1. Name: KB ACRETO RNAT
    2. If communications attributes match this:
      1. Source - select “Any Internet IP”
      2. Destination - select previously allocated IP - “kb.acreto.net Public IP”
    3. Then translate to the following:
    4. Source - select “kb.acreto.net Public IP”
    5. Destination - select " kb.acreto.net Server”
  4. Click “Save”

Ensure that NAT policy exists

  1. Go to Policies > Address Translations
  2. Find the rule you have just created and note the IP address written below " kb.acreto.net Public IP "
    1. in our case, it is 104.193.146.129.

Create security policy to add threat management

  1. Go to Policies > Security
  2. Click “Add New Policy”
  3. Create a new policy that will allow traffic to ACRETO:
    1. Name: KB ACRETO Protection
    2. Source: any
    3. Service: select TCP/80 (HTTP)
    4. Application: any
    5. Destination: select " kb.acreto.net Server”
    6. Action: Allow
    7. Threat protection - enabled
  4. Press “Save”
  5. Commit your changes

Configuration of DNS records

In your DNS server, create or change DNS record for secure.acreto.io to point to 104.193.146.129, for example:

secure   IN   A   104.193.146.129

Note: In the future, we will use CNAME records instead of A records.

Note 2: For testing, you can put this name into your host’s file (/etc/hosts on Linux/Mac) instead:

104.193.146.129  secure.acreto.io

Configuration of ACRETO web server

On ACRETO web server, configure the firewall to allow traffic to TCP ports 80 and 443 from ACRETO Public IP, in our example - 104.193.146.129

Testing

Go to http://104.193.146.129 - you should see the ACRETO website