Subsections of Acreto vGateway
Install vGateway on Windows Server - example of implementation
Overview
In this article, you’ll learn how to run Acreto vGateway on a Windows Server machine. This process involves the following steps:
- Configuration of Acreto Ecosystem
- Image installation
- Connectivity check
Before You Start
Case study
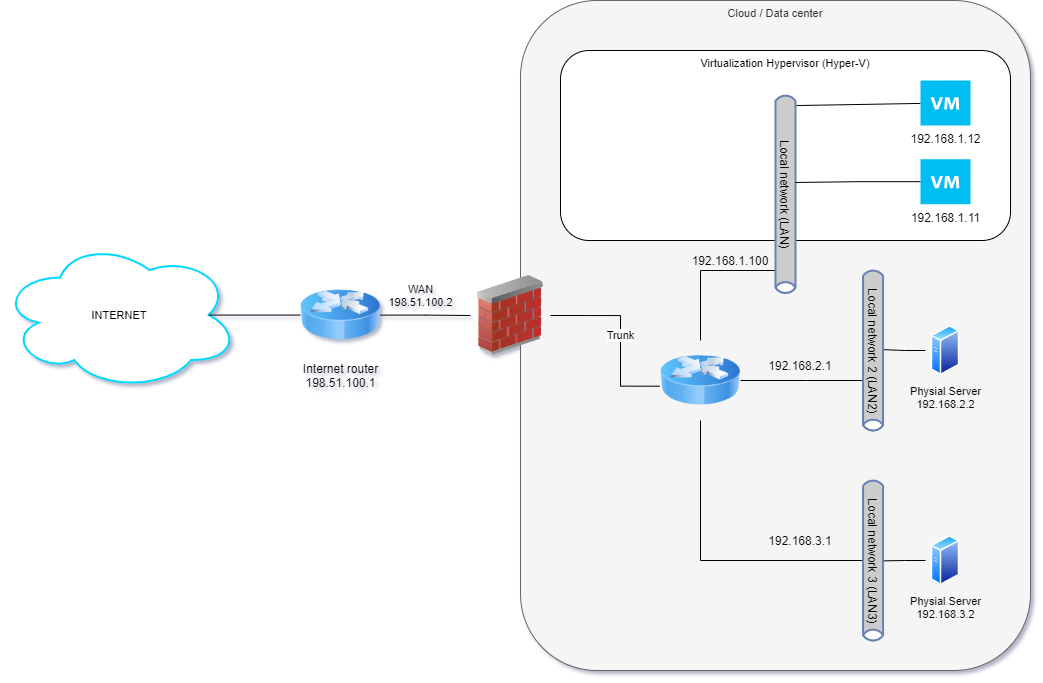
In this example, our target is to connect the existing virtual server to Acreto Ecosystem. The selected server works as a Virtual Machine based on Windows Server 2019 Hyper-V. In the same data center/cloud exist also other servers connected to different internal LANs but using the same Internet Router. The existing configuration was presented in the below diagram.
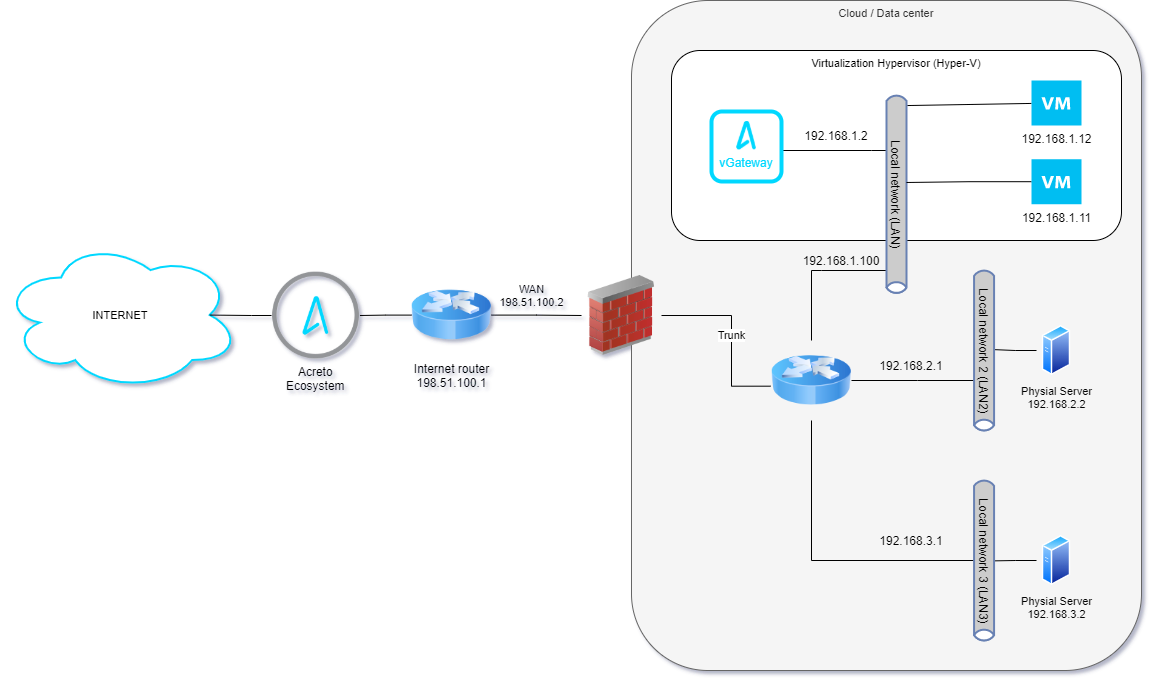
To connect the selected server to Acreto Ecosystem we will use the vGateway - a small virtual machine-generated by Acreto Wedge. This machine will be installed on the same host that other virtual machines in Data Center and connected to the same internal network. Also, network routing will be changed to redirect “external traffic” from/to the selected server thru Acreto vGateway.
The step-by-step procedure will be described in the below article.
Prerequisities
To run vGatway on Hyper-V, you will need:
- Active Acreto Ecosystem.
- Windows Server machine.
- Get familiar with Introduction to vGateway.
- Knowledge of network infrastructure and routing rules.
Configuration of Acreto Ecosystem
- Log in to an Acreto platform at wedge.acreto.net
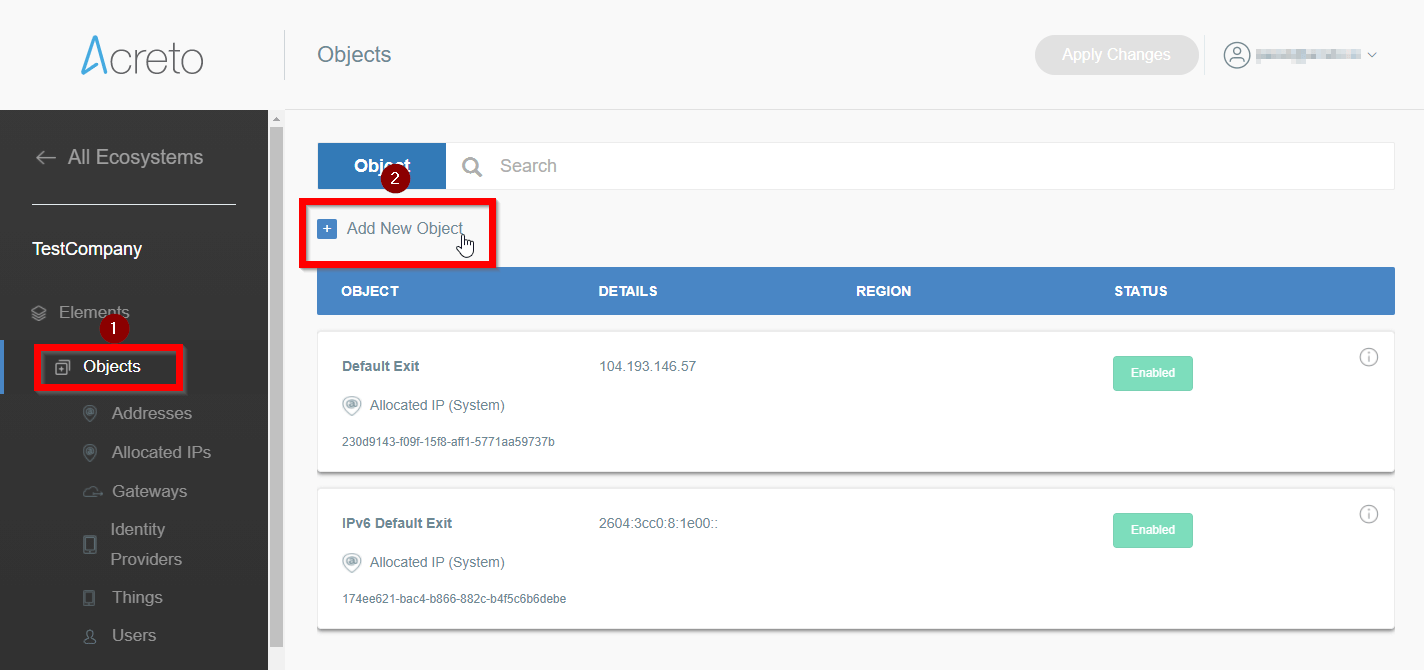
- Select your ecosystem and go to Objects (1) using the left menu.
- Click Add new Object(2) and select the Gateway Option.
- Fill at least:
- Name: - the name of the created gateway. Needs to be compatible with Strongswan connection name requirements (basically, only letters and numbers). In this example- s01gateway
- Category: IoT
- Switch Gateway type to vGateway and set the specific setting for vGateway:
- DHCP/Static: - select the method of assigning addresses on the network> In this example - Static
- vGateway Internet IP - IP address with a netmask of internet-facing (WAN) interface. In this example: 198.51.100.2/24
- vGateway Default Route - IP address of your Internet gateway/router that allows access to the Internet, for example 1.2.3.1. In this example 198.51.100.1
- vGateway Local IP: - address of local (LAN) interface of your device. In this example 192.168.1.2/32
- Local Networks: - your local network addresses that should be routed through this gateway.
In this example fill only the left field in the row: 192.168.1.12/32.
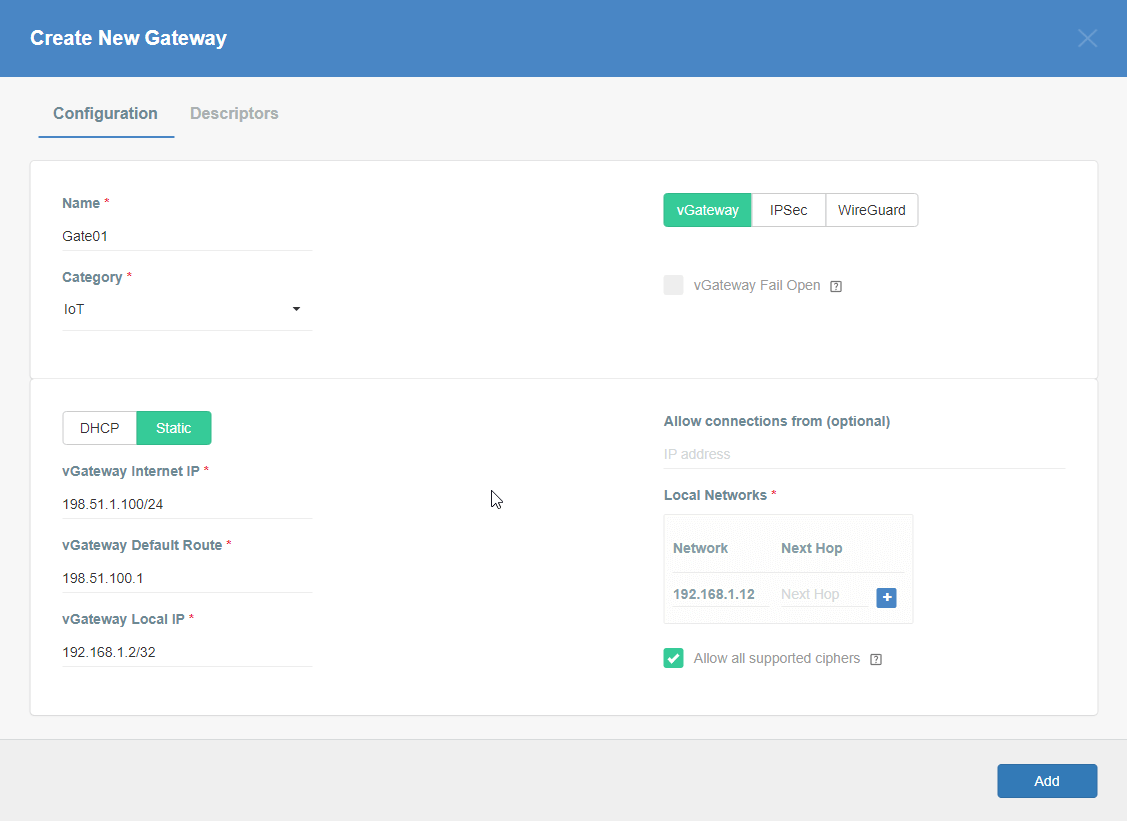
- Save the created Gateway by pressing Add.
- Add security policy that will allow communication from the Gateway device to the Internet:
- From the left menu choose the Policies option (1), then click on the + Add New Policy button (2).
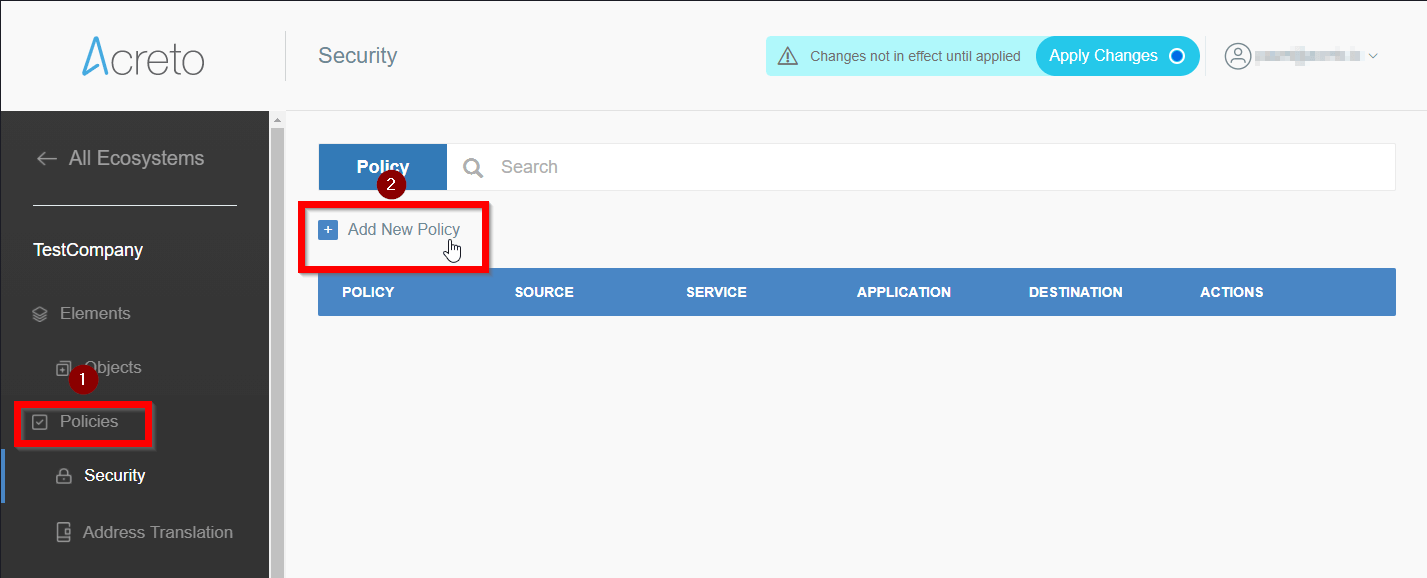
- Fill the form with values similar to that from the screen.
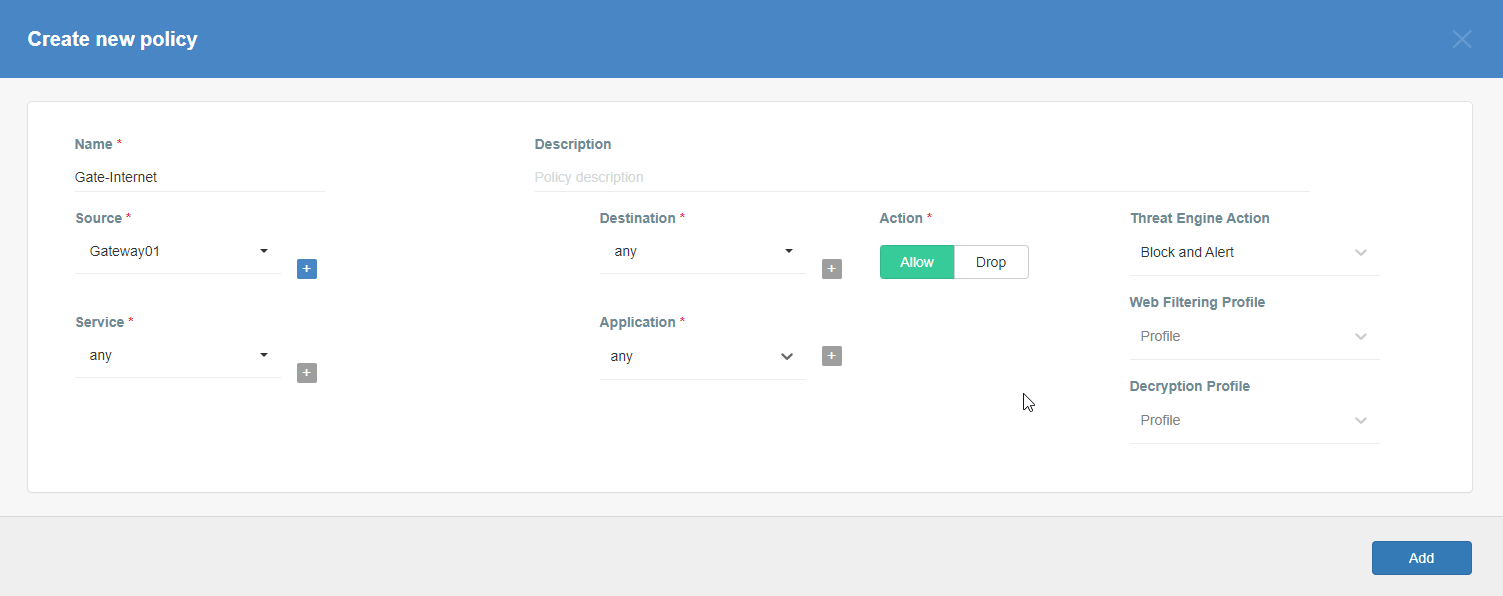
- Save the new policy by clicking on the Add button.
- Commit pending changes (top of the screen)
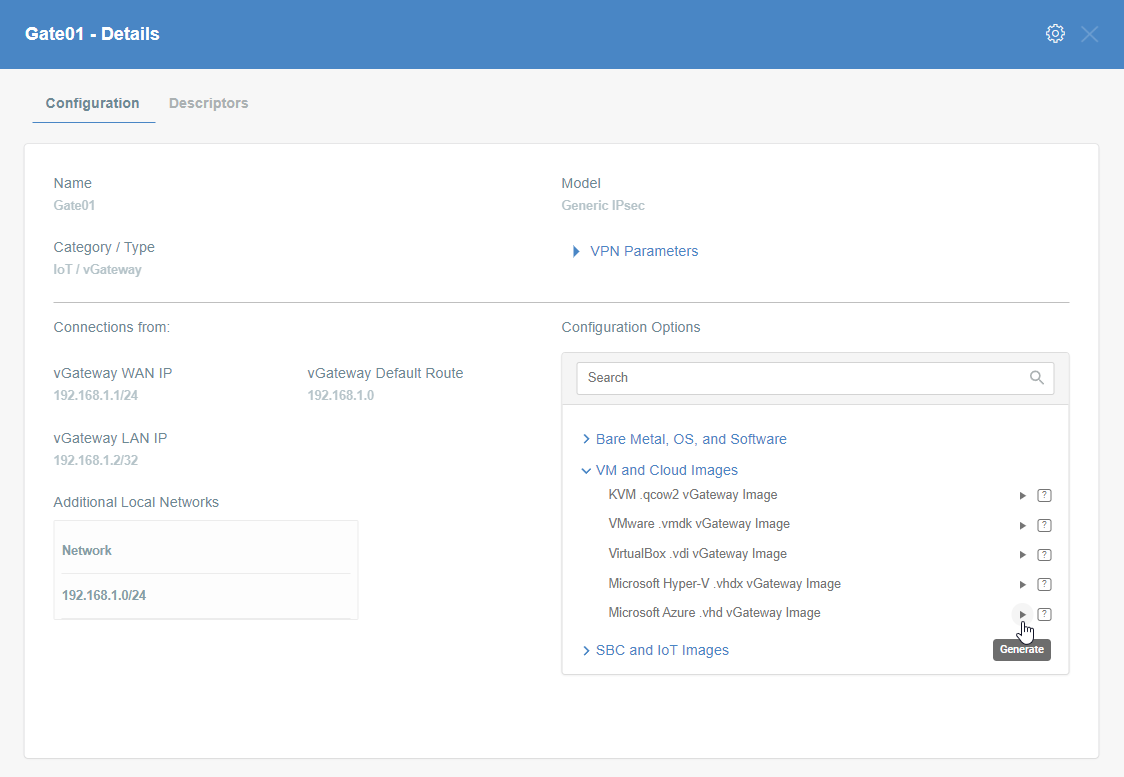
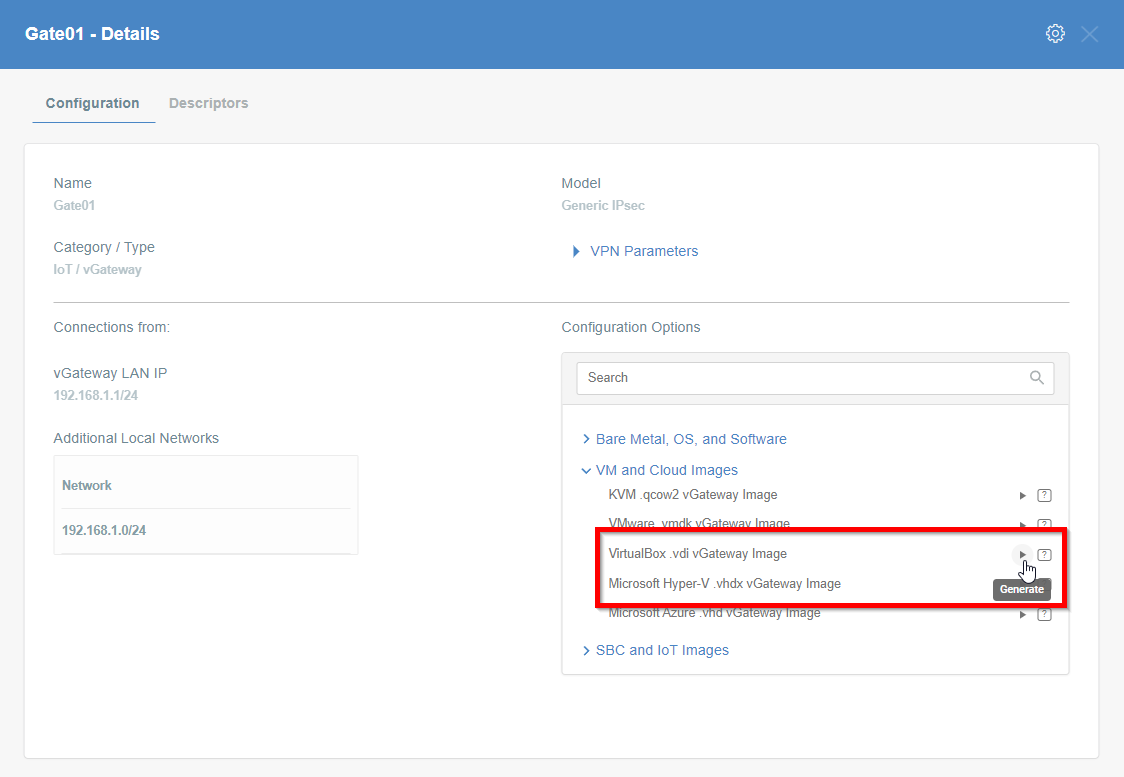
- Go to Elements > Objects > Gateways menu position.
- On the list of existing gateways choose this created in the previous step, click on its name.
- Choose VM and Cloud Images to expand the available option for download virtual images.
- Click on Play for Microsoft Hyper-V .vhdx vGateway Image option. Generation of image for you Gateway may take a while, please be patient.
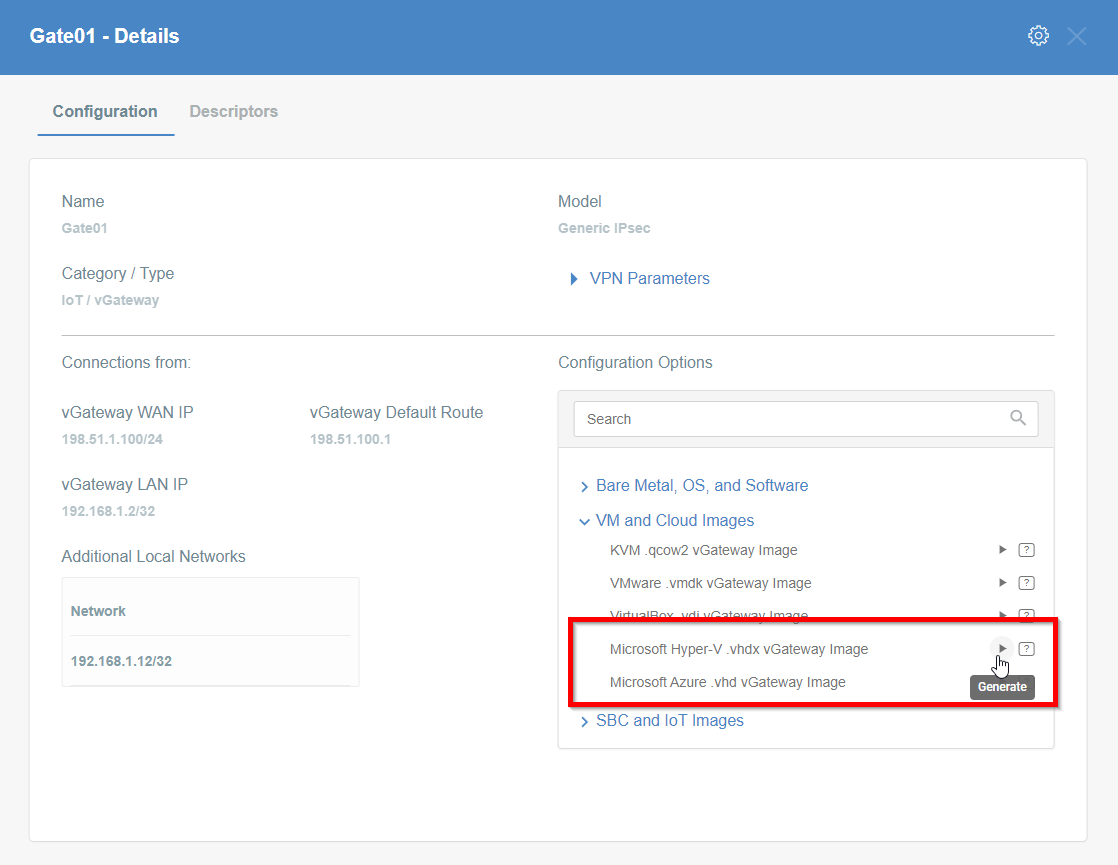
- When the image will be ready you may download it or copy the URL - save it on your Windows Server machine.

vGateway image installation
Adding the Hyper-V role to your Windows Server
Hyper-V feature is disabled by default in Windows Server. If you are sure that this option is already turned on on your machine you may skip this step.
To turn on Hyper-V on Windows Server:
- Log in to your Windows Server.
- Open the Server Manager Panel.
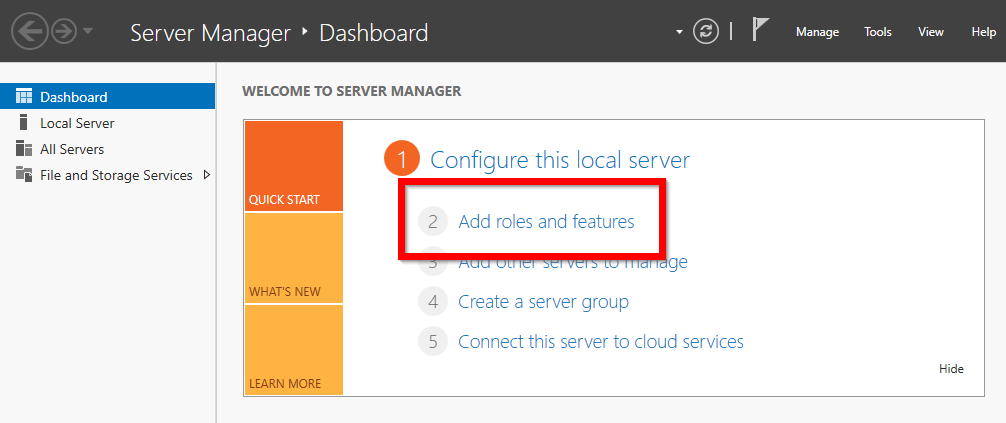
- Choose Add roles and features
- Choose Role-based or feature-based installation and click on the Next button.

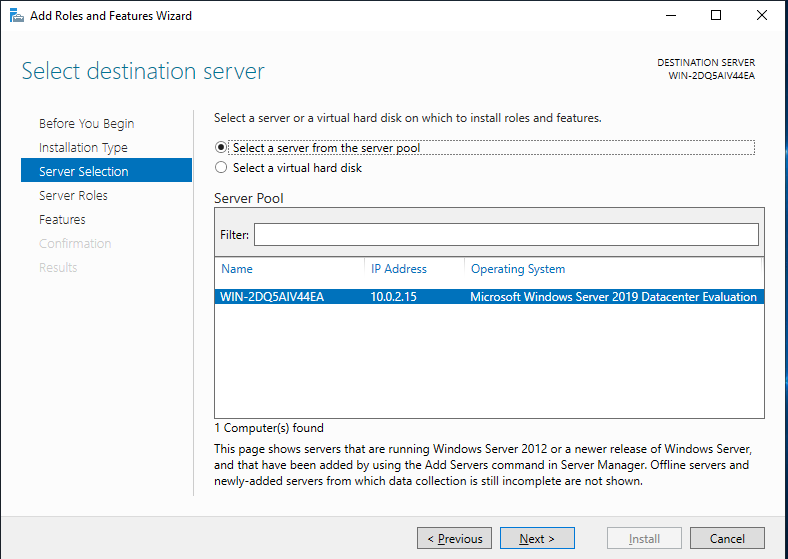
- Choose Select a server from the server pool and mark one on the list of available servers.
- On the list of the available roles search for Hyper-V, check this option and click on the Next button. If this option is already checked there’s no need to activate the Hyper-V option.

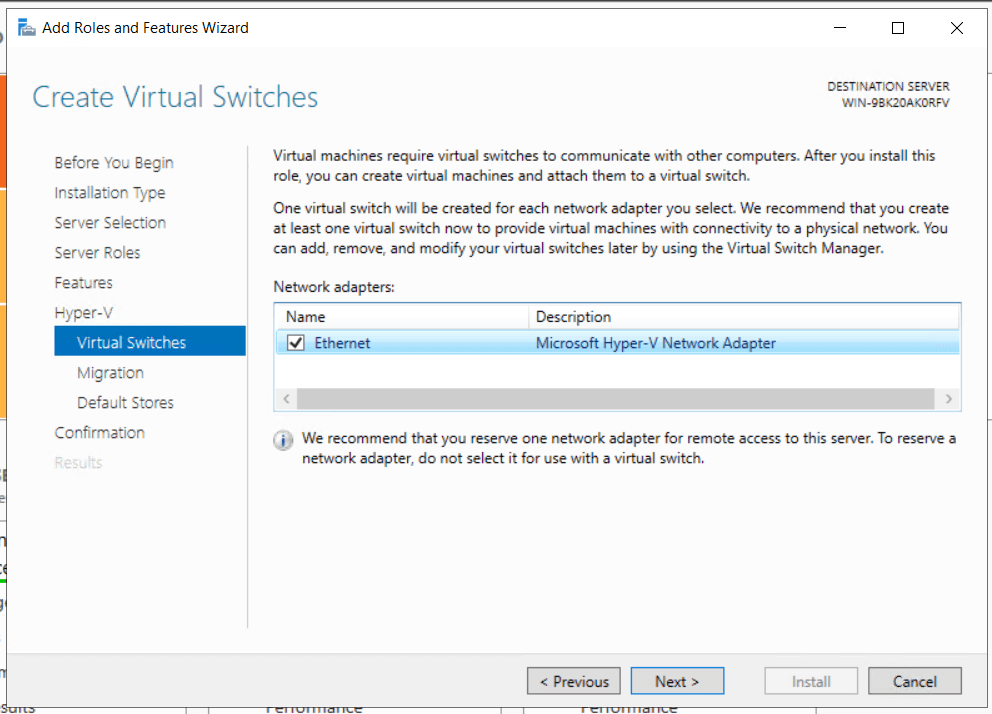
- On Hyper-V Virtual Switches screen choose the proper switch for your network configuration.
- Go thru the rest of the configuration screens.
- Restart the machine to finish Hyper-V Installation.
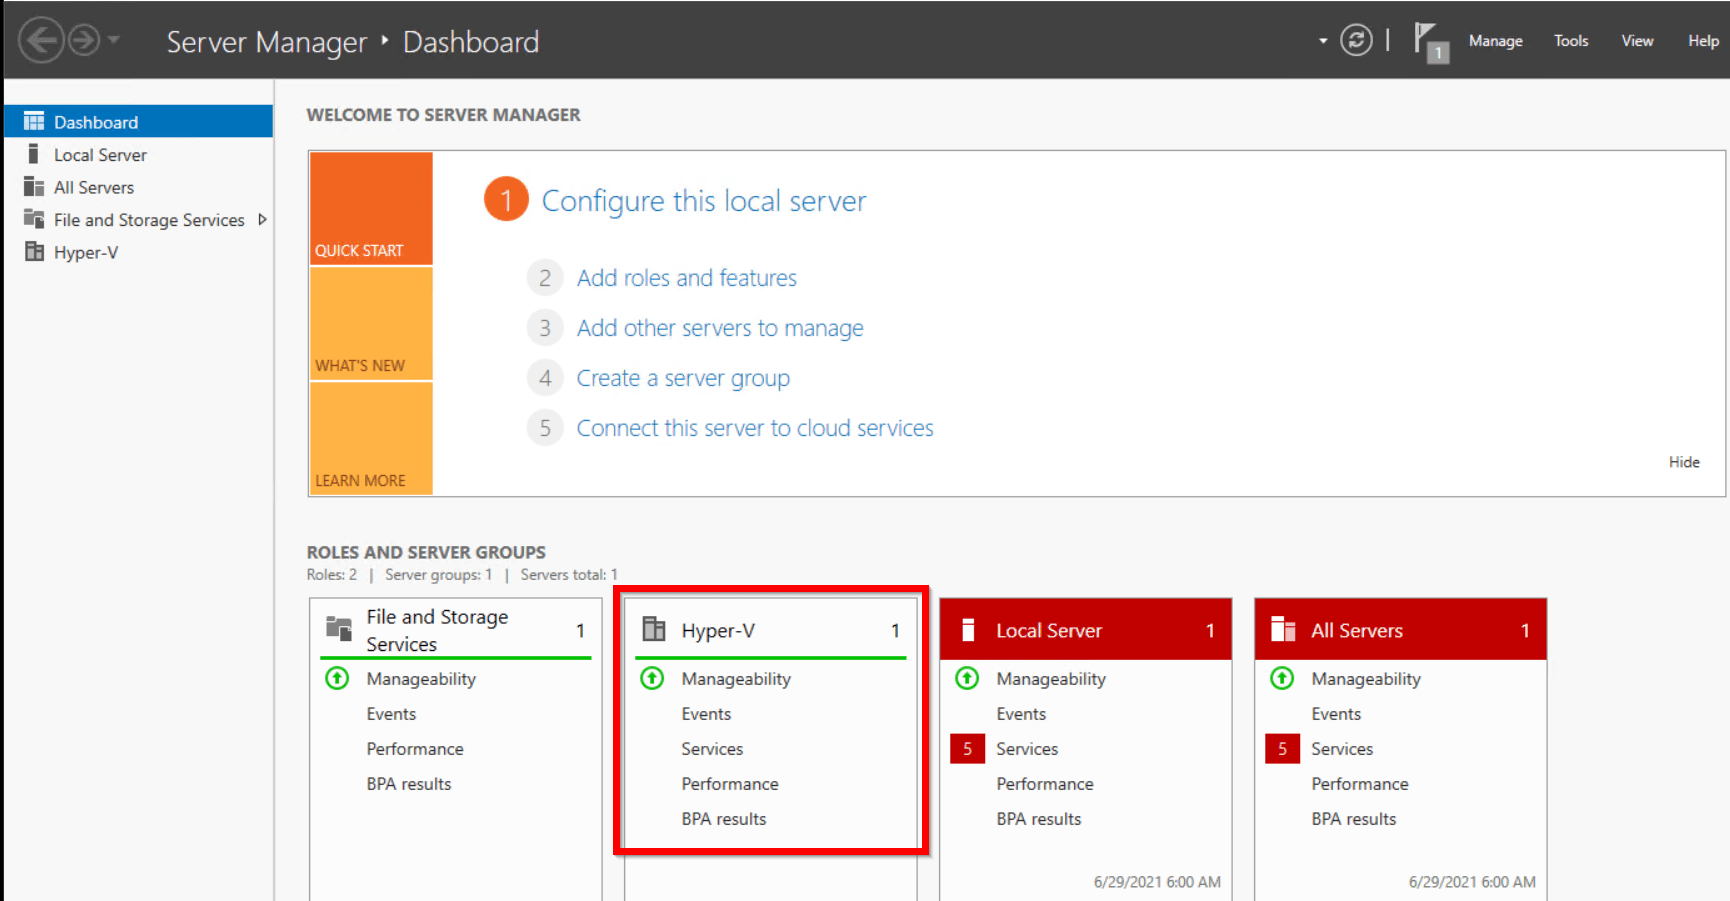
- After reset you should see Hyper-V in Roles and server groups.
Install vGateway image
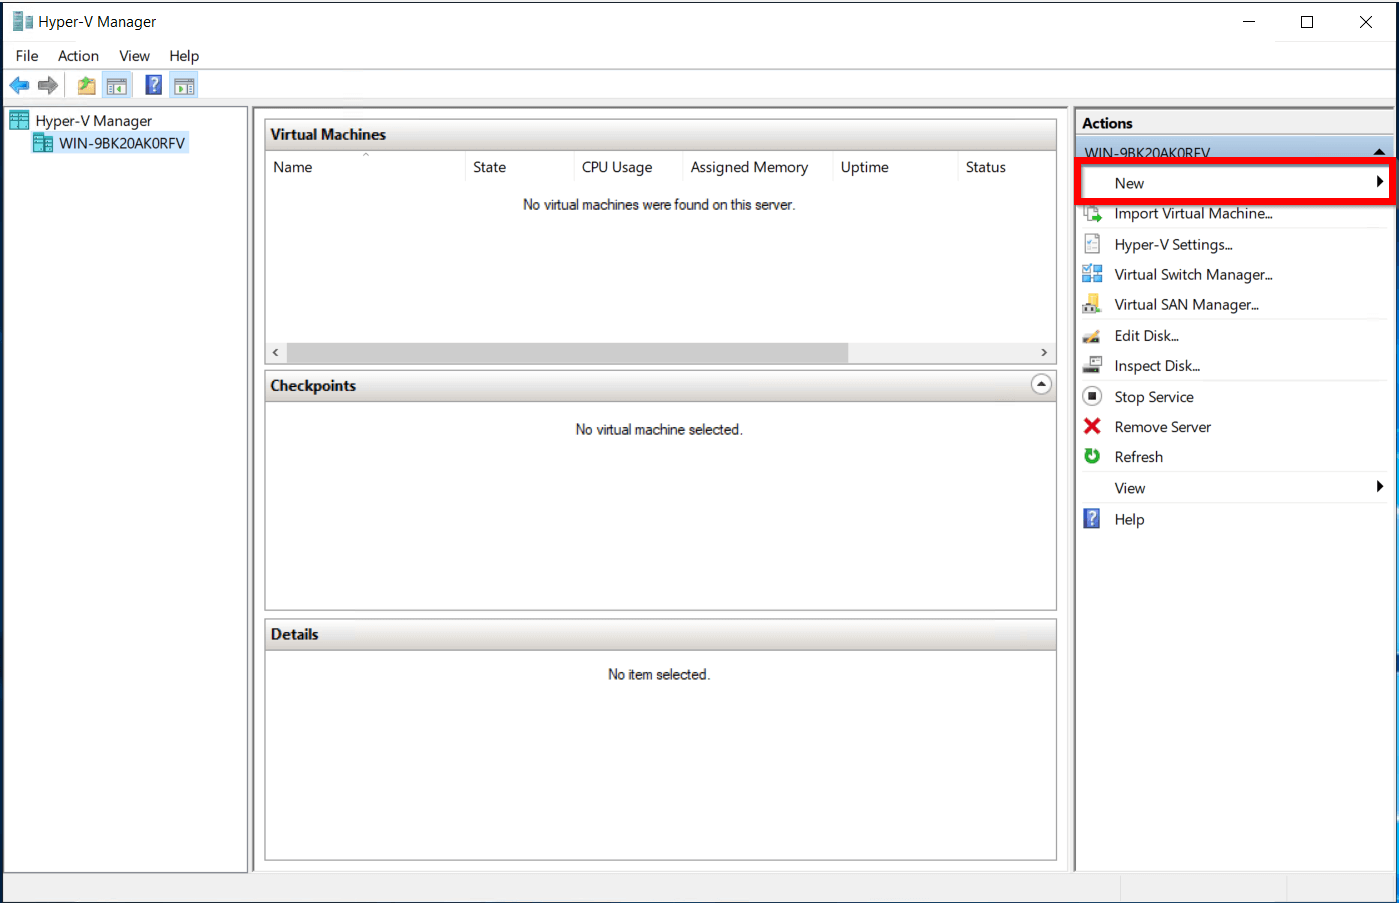
- Open Hyper-V Manager and select the New option to create a new virtual machine.
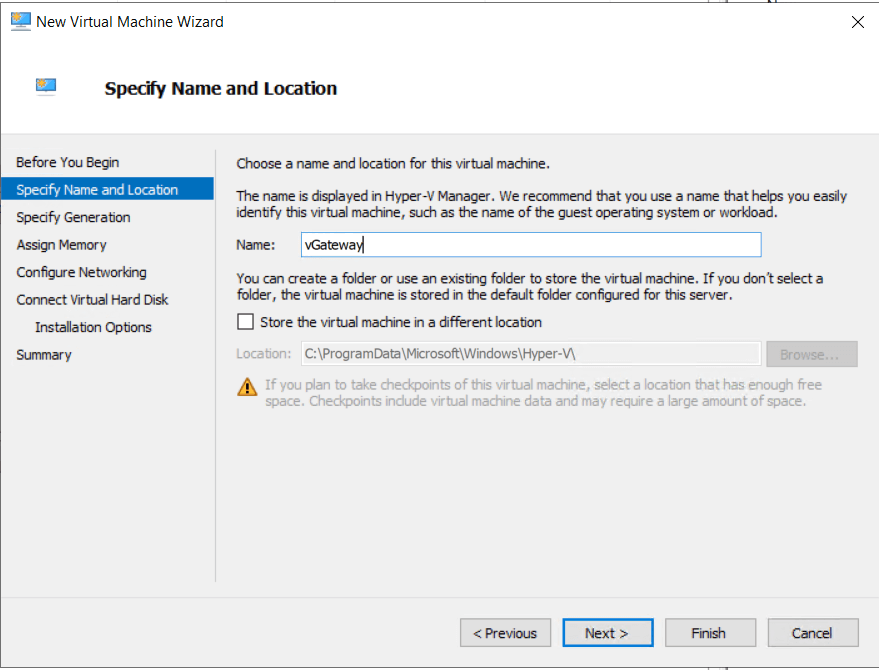
- On the Specify name and location screen call your new VM vGateway.
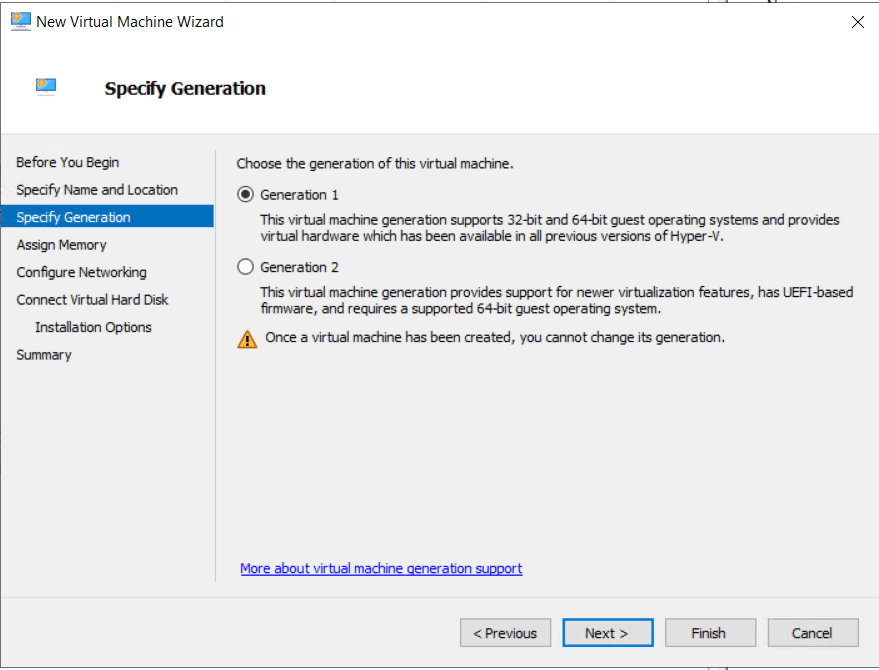
- On the Specify generation screen choose Generation 1
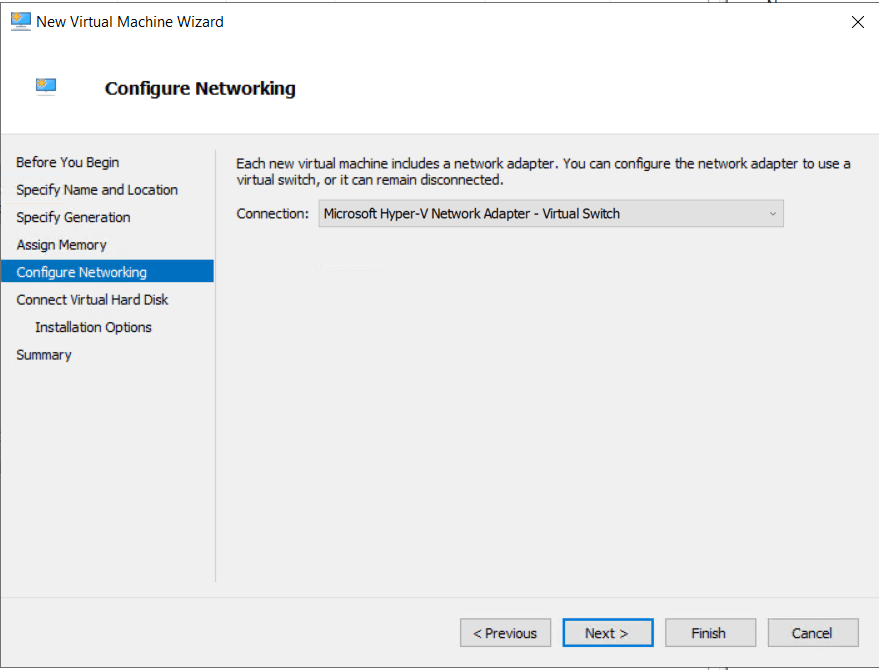
- On the Configure network screen connect VM to the proper interface.
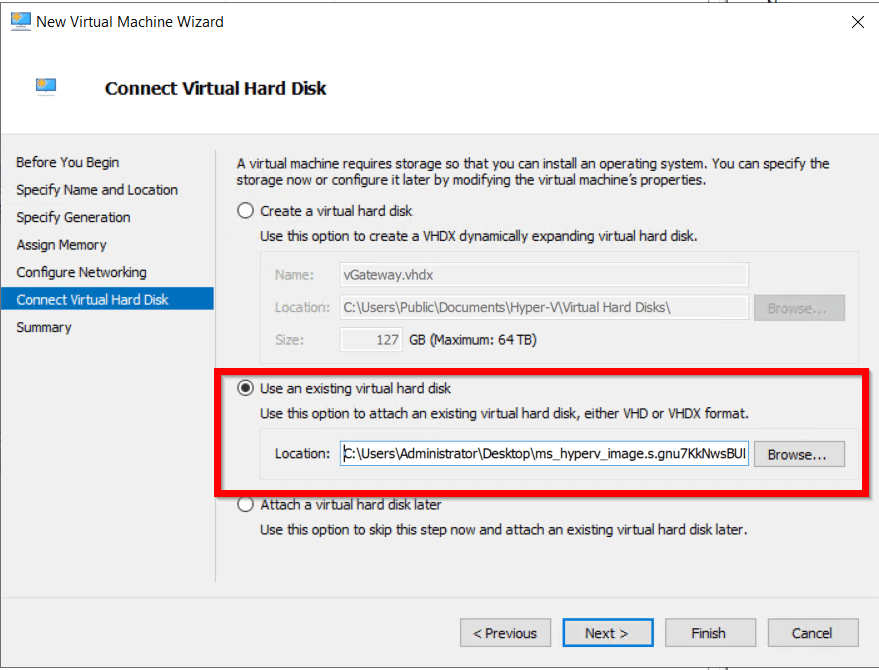
- On the Connect Virtual Hard Disc screen choose Use an existing hard disk and select downloaded vGatway image.
- Go thru the rest of the configuration steps and run the VM.
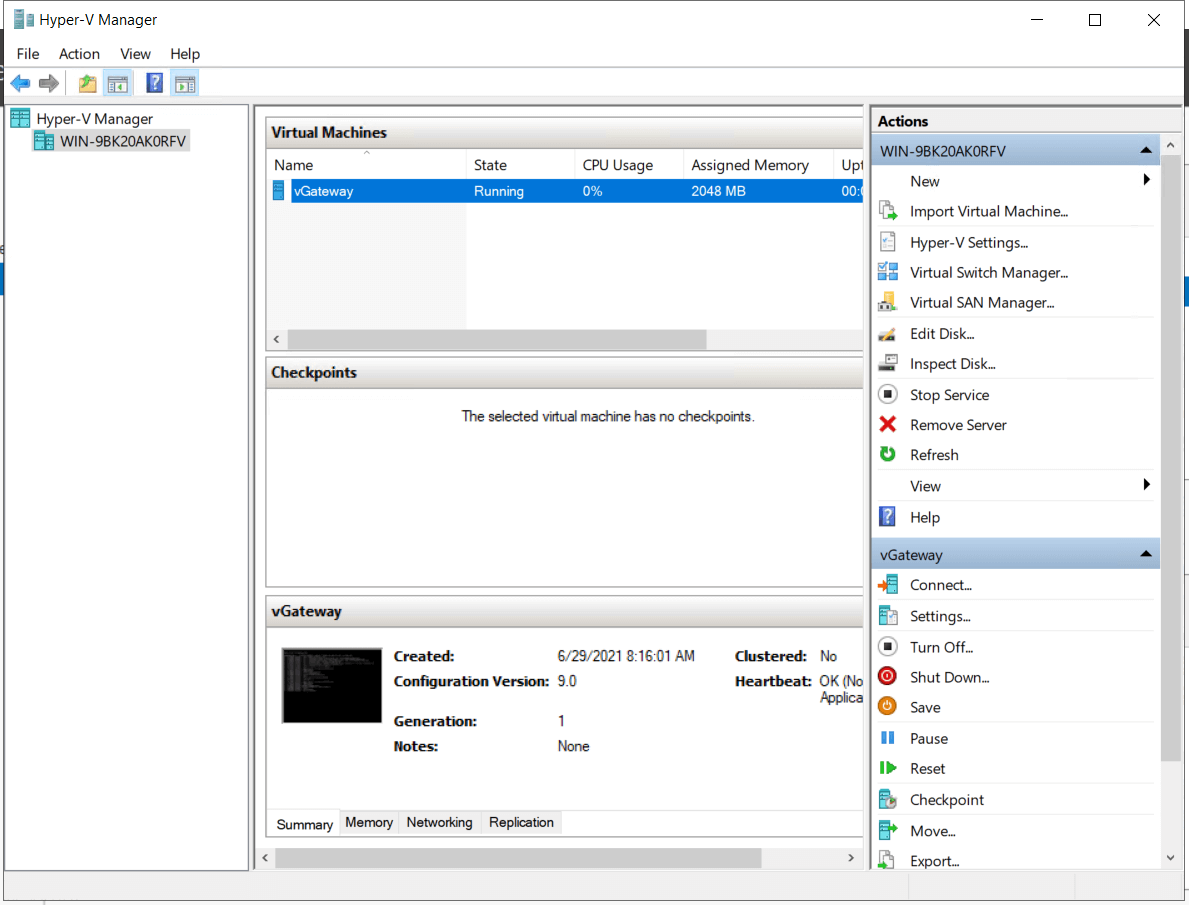
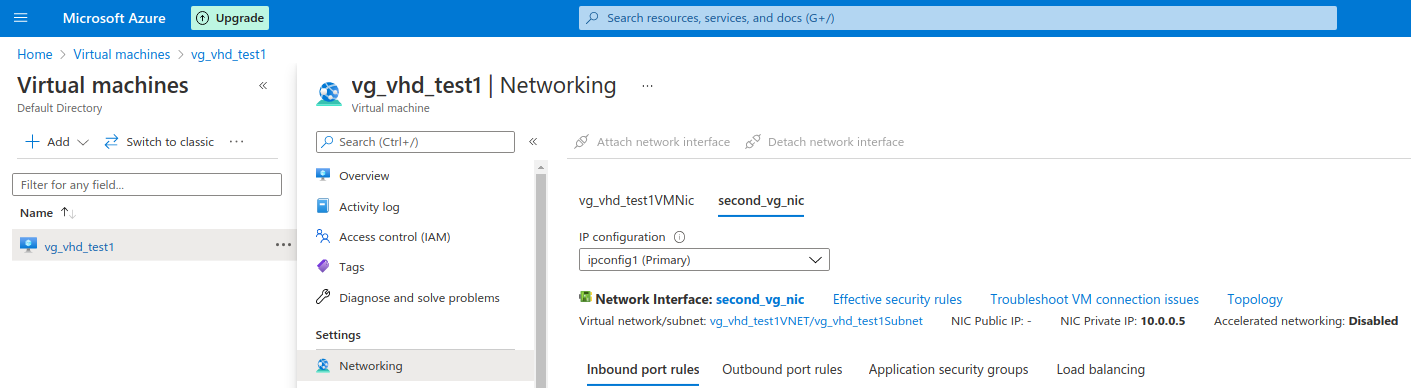
- Once the VM is up and running, you should be able to SSH to it with password authentication as:
- login: acreto
- password: acreto.io
- Change your password after the first login
Connectivity check
- Test the network connectivity
- IPsec status showing the tunnel status
ipsec statusall
- Traceroute to check if the traffic goes through Acreto Ecosystem
traceroute 8.8.8.8
- More information about checking the connectivity can be found under Connectivity Check the article where a dedicated tool is available.
Summary
Thanks to the Hyper-v technology you were able to install Acreto vGateway in just a few steps. Users can connect to an Acreto Ecosystem with the same credentials utilized for other internal resources on their network domain.
Also, Acreto Ecosystem Admin(s) can re-use any existing password and security policies that are already in place. For example, the Active Directory may already have account lockout and password expiration policies.
Introduction to vGateway
Overview
In this document, you’ll become familiar with the concepts and basic features of Acreto vGateway.
Functionality
Acreto vGateway is a software appliance that allows simple connectivity between branch offices, on-premise data centers, cloud platforms, and Acreto.

vGateway uses 2 network interfaces:
- WAN (usually the first interface on the device / VM) - used to communicate with the Internet.
- LAN (usually the second interface on the device / VM) - used to communicate with the local network.
vGateway acts as a gateway, allowing bidirectional communication between Acreto and the local network using an IPsec connection.
Devices (workstations, VMs, servers, etc.) in the local network should use vGateway’s LAN IP address as their default gateway. vGateway forwards traffic coming to its LAN interface to Acreto, and then sends traffic received from Acreto to its local destination.
Requirements
Acreto vGateway is supported on the following platforms:
- KVM (qcow2)
- VMware ESXi (.vmdk)
- VirtualBox (.vdi)
- Microsoft Hyper-V (.vhdx)
- Microsoft Azure (.vhd)
- Raspberry Pi 3 and 4
Network Connectivity

vGateway LAN interface should be connected to the LAN network. All devices in the LAN network should use vGateway as a default gateway.
vGateway WAN interface should be connected to the internet router.
Firewall
Acreto vGateway communicates with Acreto using IPv4 and IPsec protocol. To allow networking connectivity, the firewall needs to allow communication on the following ports and protocols:
- Protocol: UDP, ports: 500, 4500
- Protocol: ESP
You can find a list of IP networks used by Acreto on IPv4 and IPv6 subnets page.
NAT
Acreto vGateway can be installed behind NAT. However, if you are installing more than one vGateway behind the same NAT device, each of them must get a different public IP address.
In addition, the NAT device should have IPsec Passthrough enabled.
Example
In a deployment involving two vGateway devices (192.0.2.10, 192.0.2.11), the NAT device needs to have at least two public IP addresses (198.51.100.10, 198.51.100.11) and define Source NAT rules to assign a different public IP address to each vGateway. In this case:
- to vGateway 1 - 198.51.100.10
- to vGateway 2 - 198.51.100.11

Specification
- Base OS:
- Raspberry Pi version: Ubuntu 20.04 (LTS)
- Other platforms: Ubuntu 18.04.5 (LTS)
- Disk size (raw): 5400 MB
- Open ports:
- TCP 22 (SSH)
- UDP 500, UDP 4500 (ipsec)
Configuration
Web-based Configuration
The recommended way to configure Acreto vGateway is to modify configuration at https://wedge.acreto.net, and then generate and download a new image.
Manual Configuration
Acreto vGateway is a Linux-based solution. Administrators can connect and manage vGateways using SSH protocol and standard Linux tools. To get access credentials for your vGateway, please contact support.
Warning
vGateways with configuration modified by administrators might not be supported by Acreto.
The network configuration of Acreto vGateway is implemented using Netplan configuration files, placed in /etc/netplan. Refer to the Netplan website for more information.
IPsec connections are established using a Strongswan ipsec.conf configuration format, placed in /etc/ipsec.d/*.conf on the vGateway. The list of subnets that should be routed through Acreto is stored in /etc/ipsec.d/*.route files.
Alternatives
You can find other connectivity options on the Connect to the Acreto platform page.
Acreto vGateway uses OpenSource software that is part of Ubuntu Linux.
You can find more licensing information on the Ubuntu website, at https://ubuntu.com/licensing.
Troubleshooting - Unsupported or invalid disk error in ESXi
Error Description
Failed to power on virtual machine XXXXXX . Unsupported or invalid disk type 23 for ‘scsi0:1’. Ensure that the disk has been imported.

Cause
This issue occurs if a virtual machine that is meant for VMware Hosted products such as VMware Workstation, VMware Player or VMware Fusion is powered-on on an ESX/ESXi host.
The underlying format used to store virtual machines on VMware Hosted products differs from the format used to store virtual machines on ESX/ESXi hosts.
Solution
The .vmdk file needs to be converted to the accepted the ESXi format using the steps below:
-
Upload the .vmdk file to datastore in ESXi
-
Connect to the ESX/ESXi host via SSH
-
Run the below commands to convert the file
cd vmfs
cd volumes
cd datastore1
vmkfstools -i xxxxxx.vmdk xxxx-New.vmdk
Result
After successful conversion new file will be generated.
vGateway image installation on Azure
Overview
This article shows how to setup vGateway on Azure to connect your
network to Acreto Ecosystem.
Create new Gateway
To set up the vGateway on Azure first it is needed to configure the
Gateway object.
Please follow the steps in Gateway creation guide with the vGateway as a type of a gateway.
Generate Azure .vhd type vGateway Image
To generate an Azure the image you need to:
- In the Elements > Objects > Gateways menu click on the specified vGateway name - the details panel will appear.
- On the right side of the gateway details panel click on VM and Cloud Images images to show a list of options to generate images.
- Click the play icon next to the Microsoft Azure .vhd vGateway Image entry.
- The generation of the image may take a while, please be patient.
- When the image will be ready you may download it or copy the URL - save it on your PC.
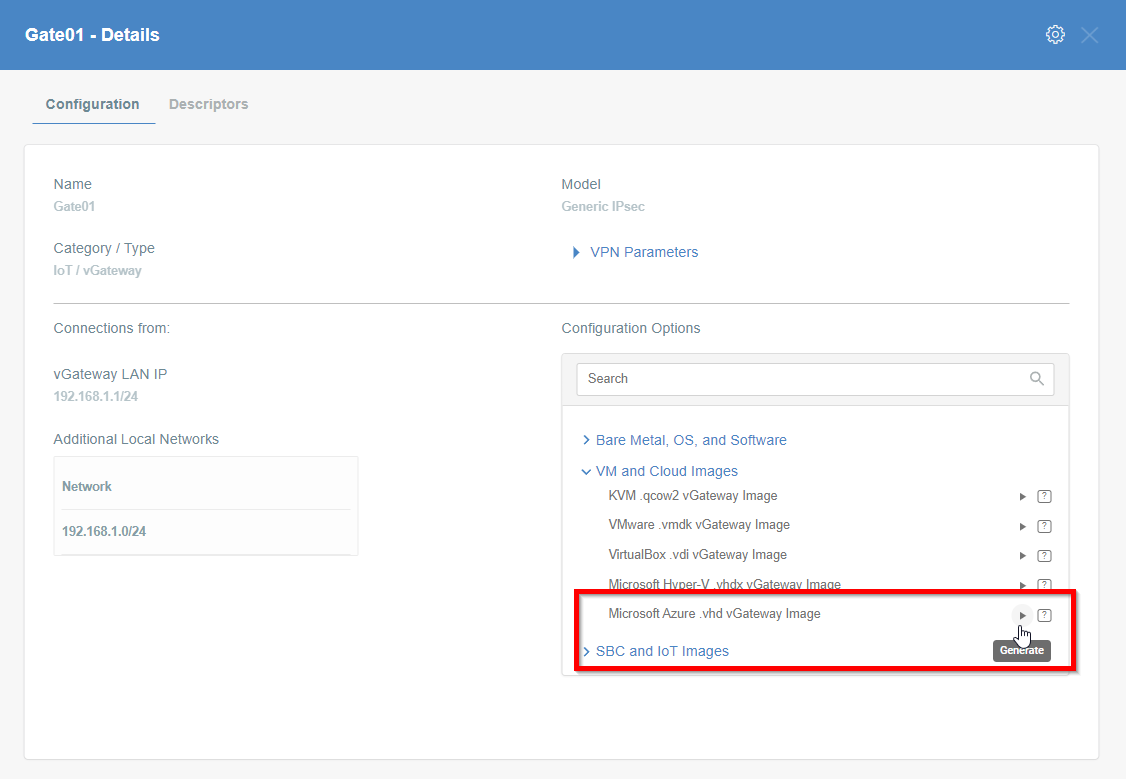
Image installation
To install the generated vhd image on Azure we need to proceed with uploading the image to Azure according to official documentation.
-
Create an empty managed disk on Azure.
-
Upload a vhd image to empty managed disk.
-
Start the VM with the uploaded image.
-
Once the VM is up and running, you should be able to SSH to it with password authentication as:
- login:
acreto
- password:
acreto.io
-
Change your password after the first login
-
Test the network connectivity
More information about checking the connectivity can be found under
Connectivity Check
the article where a dedicated tool is available.
vGateway image installation on VirtualBox
Overview
This article shows how to set up vGateway on VirtualBox to connect your network to Acreto Ecosystem.
Create new Gateway
To set up the vGateway on VirtualBox first it is needed to configure the Gateway object.
Please follow the steps in Gateway creation guide with the vGateway as a type of a gateway.
Generate VirtualBox .vid type vGateway Image
To generate a VirtualBox vid image you need to:
- In the Elements > Objects > Gateways menu click on the specified vGateway name - the details panel will appear.
- On the right side of the gateway details panel click on VM and Cloud Images images to show a list of options to generate images.
- Click the play icon next to the VirtualBox .vdi vGateway Image entry.
- The generation of the image may take a while, please be patient.
- When the image will be ready you may download it or copy the URL - save it on your PC.

Image installation
To install the generated vdi image we need a machine with a VirtualBox hypervisor installed.
-
Create a new VM from vdi image by opening the Machine > New menu.
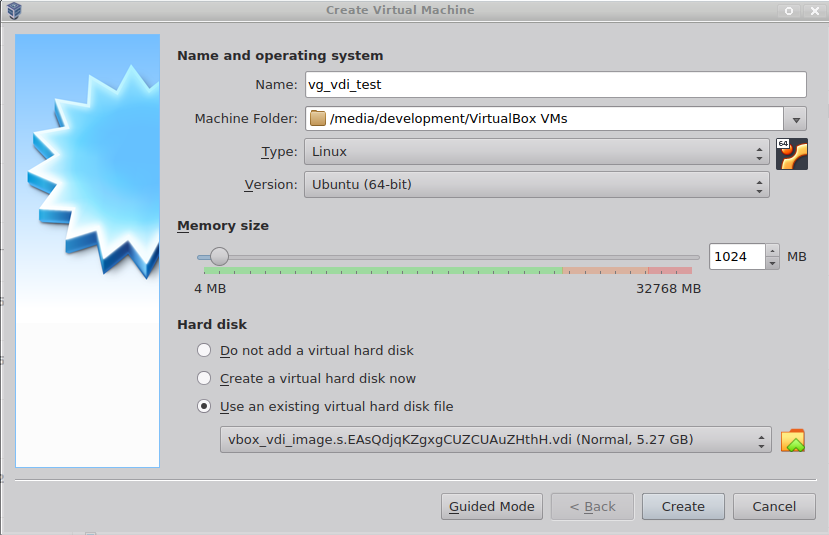
- In Type choose Linux.
- In Version choose Ubuntu (64-bit).
- In Hard disk choose Use an existing virtual hard disk file and select previously downloaded vdi image.
-
Start the VM.
- Ensure Acreto Ecosystem is routable from the hypervisor network.
- Enable a second network interface in the machine settings Network section.
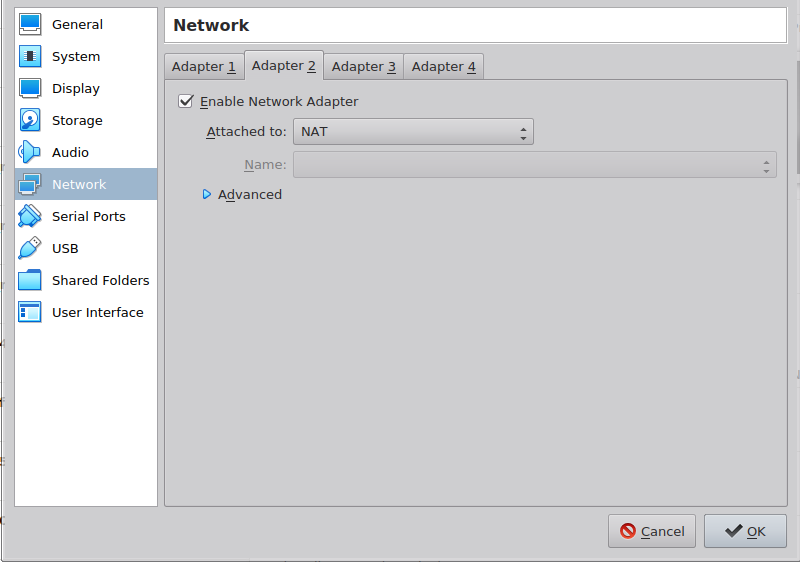
- Run the VM.
-
Once booted log in as:
- login:
acreto
- password:
acreto.io
-
Change your password after the first login
-
Test the network connectivity
More information about checking the connectivity can be found under Connectivity Check article where a dedicated tool is available.
vGateway installation on RasbperryPi
Overview
This article explains how to set up a vGateway on Raspberry Pi to connect your network to an Acreto Ecosystem.
Create New Gateway
To set up the vGateway on Raspberry Pi, you must first configure the Gateway object.

Please follow the steps below to create and configure a new Gateway that will be used as vGateway.
- Log in to the Acreto Portal at wedge.acreto.net.
- Select your Ecosystem and go to Objects using the left-side menu.
- Click Add new Object and select Gateway.
- Fill in the following fields:
- Name: the name of the gateway
- Category: IoT
- vGateway: select Gateway in the upper right corner
- DHCP/Static: Select DHCP
- vGateway Local IP: IP address of Raspberry Pi device in your LAN, i.e
192.168.200.1/24
- Local Networks: your local network addresses that will be routed through this gateway
- Save the created Gateway by pressing Add.
- Add a security policy that will allow communication from the Gateway device to the Internet.
- Commit pending changes (located at top of the screen).
Tip
To simplify testing, add the IP addresses of every interface connected to your gateway as Local Networks (you can use /32 prefix for public interface). This will allow testing connectivity from the gateway through Acreto using Ping, Traceroute, or similar tools.
Note
To successfully test your connectivity, you also need to create a security policy that will allow traffic to go through your device.
Generate Raspberry Pi vGateway Image
To proceed with this step, you should have at least one Gateway configured as vGateway in your Ecosystem. From the left-side menu, select Objects > Gateways to display the list of existing gateways.
To generate a Raspberry Pi configuration image, you must:
- Click on the vGateway name on the vGateway panel. The details panel will then appear.
- On the right side of the gateway details panel, click on SBC and IoT Images to view a list of image generation options.
- Click the play icon for the right version of the device.
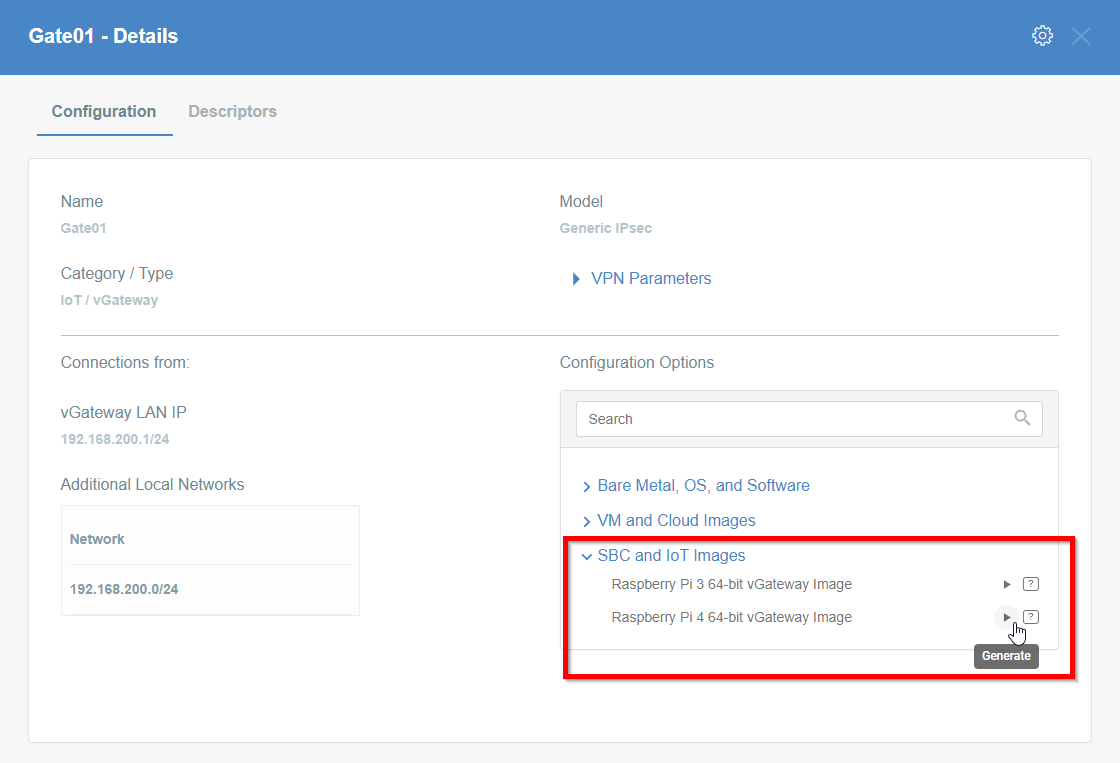
- The generation of the image may take a while, please be patient.
- When the image is ready, you may download it or copy the URL & save it on your PC.
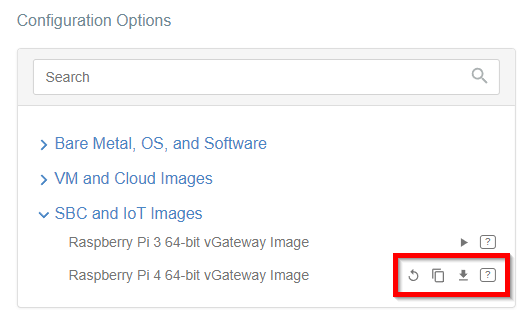
Image Installation
Linux
To proceed with this step, you must have an image file generated by Acreto or a URL to the image for your vGateway.
To install the image, you must first proceed with flashing the SD card.
-
Download the write_image.sh script.
Click on the button and save the script in your home directory:
Get write_image.sh
or open the terminal and download the script using the command:
wget https://kb.acreto.net/reference-material/downloads/write_image.sh
-
Take the SD card out of your Raspberry Pi device.
-
Insert the SD card into your computer.
- Ensure it doesn’t mount automatically - if it does, unmount it.
-
Use the write_image.sh script to write the image onto the SD card.
-
if you have an image file downloaded locally:
./write_image.sh image-file.zip /dev/sdb
-
if you want to use the URL of an image directly:
./write_image.sh https://aws1-vgateway-images.s3.amazonaws.com/vgateway-raspberry-pi4.s.nAH2xOL8HyJIK1g8v4HEsNCt.img.zip /dev/sdb
where /dev/sdb is the location of your SD card
-
Once finished, take the SD card from your computer and plug it into your device.
-
Restart the Raspberry device and wait until it boots from the SD Card.
-
Log in to your WEDGE account.
-
From the left menu choose the Logs > Gateways option.
-
As one of the last inputs, you should see information about the established connection from your Gateway.
More information about checking the connectivity can be found in the Connectivity Check article, where a dedicated tool is available.
Windows
To proceed with this step, you must have an image file generated by Acreto.
-
Take the SD card out of your Raspberry Pi device.
-
Insert the SD card into your computer, wait until it is visible in the system.
-
Unzip the file downloaded from WEDGE, make sure that you can see the *.img file.
-
Go to Raspberry Pi Software Page.
-
Download the last version of Raspberry Pi Imager.
-
Run downloaded *.exe file and install it.
-
If Raspberry Pi Imager doesn’t start after installation, run it manually. You should see the window presented below:
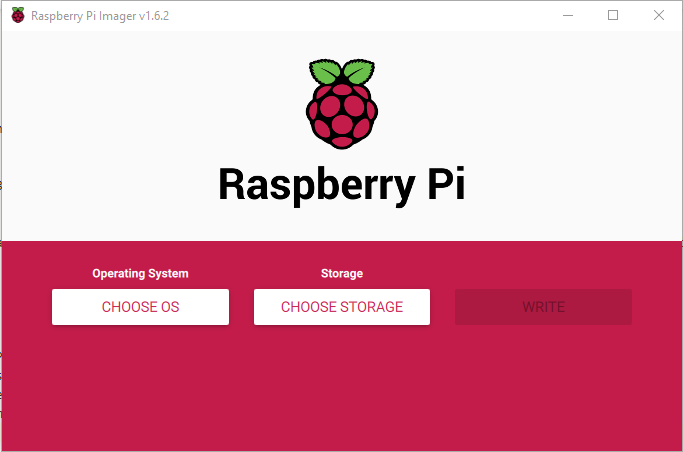
-
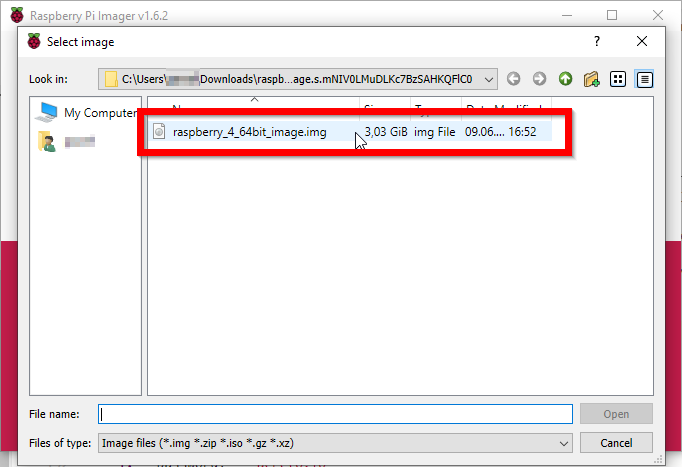
Click on the Choose OS button and select the Use custom option.
-
Select a downloaded image using the explorer window.
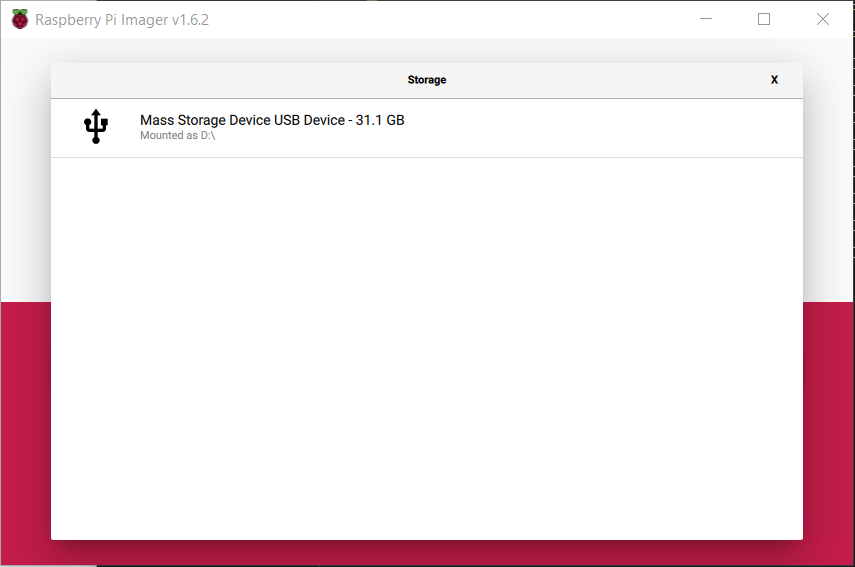
-
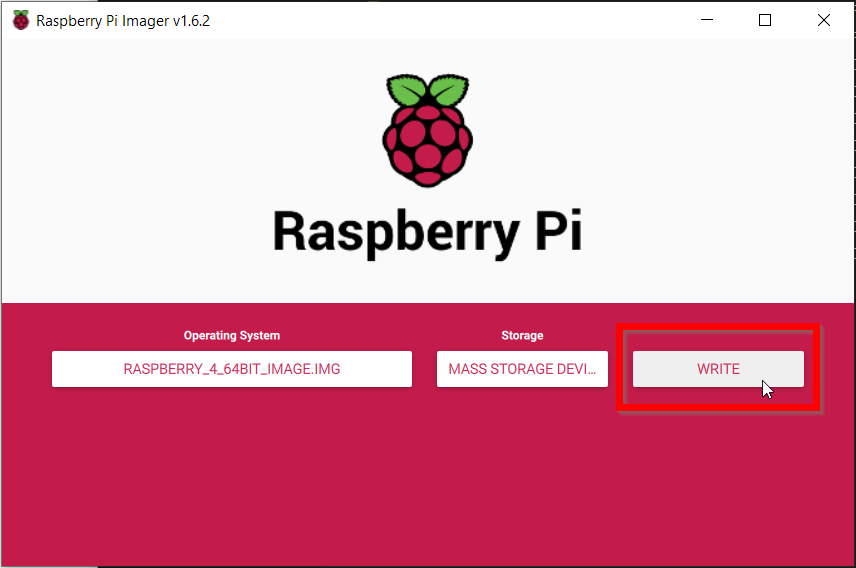
Click on the Select Storage button and choose your SD Card.
-
Double-check the settings and if they’re OK, click on the Write button.
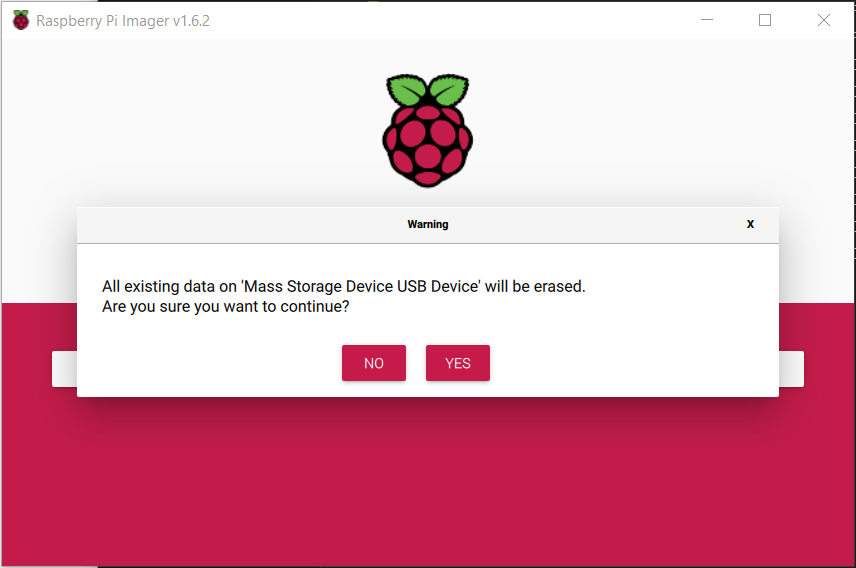
-
The writer will warn you about erasing the current content of the SD Card, click on the YES button to continue.
 Now the Writing process will start, it may take a few minutes.
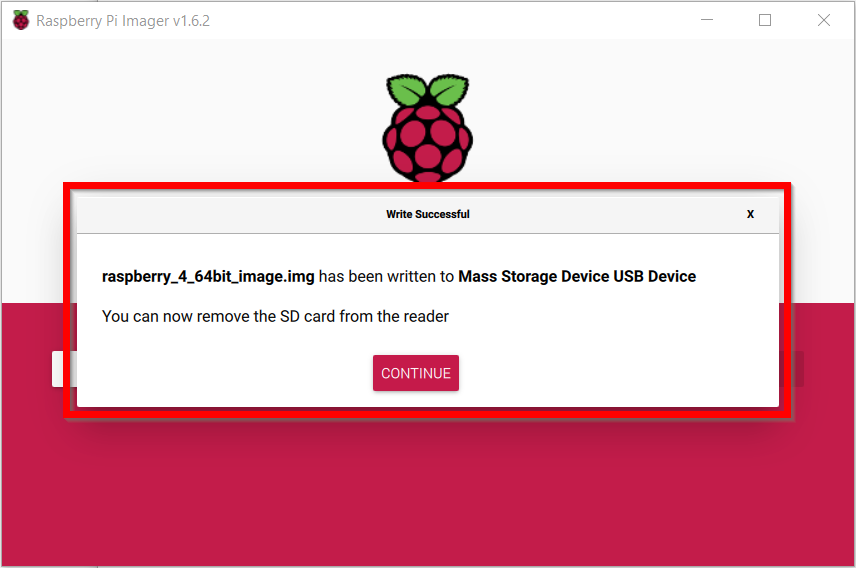
-
When writing ends, you should see the below information.
-
Once finished, take the SD card from your computer and plug it into your device.
-
Restart the Raspberry device and wait until it boots from the SD Card.
-
Log in to your WEDGE account.
-
From the left menu choose the Logs > Gateways option.
-
As one of the last inputs, you should see information about the established connection from your Gateway.


More information about checking the connectivity can be found in the Connectivity Check article, where a dedicated tool is available.
List of Supported USB Ethernet Adapters to Use for LAN
By default, the Raspberry Pi has only one Ethernet adapter. But to connect your network, you’ll need an additional Ethernet adapter.
Acreto recommends using a USB Ethernet dongle facing the LAN network.
Show the list of supported USB Ethernet devices
USB Ethernet Adapters Officially Supported by Acreto
- TP-Link
- TP-Link UE300 USB 3.0 to Gigabit Ethernet Network Adapter.
- Works out of the box on Raspbian Wheezy on a Pi 2 Model B.
- No external power source or USB hub needed.
- Pi is powered by a 2.5 amp power supply.
Other Raspberry Pi Supported USB Ethernet Adapters
Other devices:
Warning!
Please note that this is a list of USB Ethernet adapters confirmed to work by the Raspberry Pi Community. None of the devices below were tested by Acreto.
- ADMtek
- ADM8511 Pegasus II Ethernet, full-speed, idVendor=07a6, idProduct=8511:
- Works out of the box. No external power source needed.
- AVM
- FRITZ!Box WLAN 3030 USB Ethernet Adapter: Works out of the box.
- No external power source needed.
- ASUS
- USB 2.0 to Fast Ethernet Adapter (ASIX AX88772B)
- USB Ethernet Adapter: As distributed with Zenbook Ultrabooks.
- Works out of the box.
- No external power source needed.
- Cable Matters
- USB 3.0 to Gigabit Ethernet Adapter (ASIX AX88179) USB Ethernet Adapter.
- NOTE: Since Raspbian 3.8.y kernel does not include a driver for this hardware, you must build a new kernel module from the source code provided by ASIX here.
- Easy to follow instructions on how to download the kernel source code and symbol files can be found in the second posting here, including how to compile the module.
- For Raspbian 3.9.+ the driver is already included in the distribution.
- Wintech
- USB 2.0 LanCard Model: LAU-15 (CK0049C) using the mcs7830 driver.
- Probably needs more than 100 mA current. [1]
- LogiLink
- USB 2.0 UA0144: AX88772 chipset using the ASIX kernel driver.
- Does not work without a powered USB hub. (idVendor=0b95, idProduct=772b)
- LogiLink Fast EN USB 2.0 to RJ45 Adapter: Test on Wheezy-Raspian
- (2012-08-16) without USB Hub will be confirmed
- lsusb output: Bus 001 Device 004: ID 9710:7830 MosChip
Semiconductor MCS7830 10/100 Mbps Ethernet adapter
- BE CAREFUL: There exists a copied Chinese version without the
Logilink logo using the Kontron DM9601-chip (see “Problem Ethernet
adapters” below). This only supports USB1.1 and isn’t well-supported in
Linux. If you get a model without the Logilink logo and the model number
JP1082, it’s a fake.
- Apple
- Apple USB Ethernet Adapter using ASIX kernel driver.
- Works out of the box (driver present since kernel 2.6.32).
- Doing OK using Apple USB charger and Pi’s own USB port.
- USB register states that it draws max. 250 mA.
- Belkin
- USB 2.0 Ethernet Adapter (F4U047)
- Works out of the box without any needed setup.
- No powered USB hub needed, tested on Raspberry Pi A+.
- Edimax
- Edimax EU-4208 USB2.0 Fast Ethernet Adapter
- (idVendor=0b95, idProduct=772b)
- Works out of the box.
- Requires own power supply (from powered USB hub).
- Edimax EU-4230 USB2.0 Fast Ethernet Adapter with 3 port USB hub
- Works out of the box.
- Requires own power source.
- D-Link
- D-Link DUB-E100 Fast Ethernet USB 2.0 Adapter
- Works out of the box.
- Requires own power supply (from powered USB hub).
- LinkSys
- LinkSys - USB200M - Compact USB 2.0 10/100 Network Adapter
- Raspbian recognizes it automatically.
- Tested on a powered USB hub.
- Linksys - USB300M - Compact USB 2.0 10/100 Network Adapter
- Works out of the box.
- Doesn’t require powered hub when powering Pi using MicroUSB supply
rated for 0.7A output.
- Linksys - USB3GIG v1 (Vendor ID: 13b1, Product ID: 0041)
- USB 3.0 gigabit adapter
- Works very well on a Raspberry Pi 2 running Raspbian 2015-02-16.
- Faster than the built-in adapter, connects at gigabit rate.
- iperf tests show about 150 - 175 Mbit speed.
- Pluscom
- Pluscom U1EC
- Davicom DM9000E chipset
- DM9601 driver
- Max current 144mA
- Unlike later ( what is later? ), USB 1.1 devices using the same driver
- Pluscom U2E-ADM8515
- ADMtek, Inc. AN8515 Ethernet chipset
- Pegasus driver
- Max current 224 mA
- Works with a Model “A” Pi if plugged into an external
(maybe unpowered) hub.
- Sabrent
- Sabrent USB 2.0 10/100 Ethernet Adapter
- Works out of the box (ASIX).
- USB 2.0 only
- (Does not work if using dwc_otg.speed=1 in cmdline.txt to force USB 1.1
for other problem hardware)
- Sitecom
- Sitecom LN-030 V2 detected as ASIX AX88772 USB 2.0
- Ethernet Adapter works out of the box.
- Doesn’t seem to require any extra power supply.
- TrendNet
- Trendnet TU2-ET100 Adapter works out of the box.
- Trendnet TU3-ETG Gigabit USB 3.0 Adapter works out of the box.
- Works well on a Raspberry Pi 2 running OSMC Release Candidate.
- SMB test shows approx 150mpbs.
- Hama
- Hama 00049244 Fast Ethernet USB 2.0-Adapter
- Detected as MOSCHIP 7830/7832/7730 usb-NET adapter.
- Works out of the box on Debian Wheezy/sid (2012-08-08-wheezy-armel).
- (Not tested yet on other OS).
- No external power source or USB hub needed.
- Newlink
- Newlink NLUSB2-ETH USB 2.0 Ethernet Adapter
- Works out of the box on Raspbian.
- Detected as ASIX AX88772.
- ASix driver
- Max current 250mA
- Works without a powered hub or when plugged into an unpowered hub.
- Axago
- Axago ADE-X1 10/100 Ethernet Adapter (USB: 9710:7830 driver:mcs7830)
- Adapter needs the last Raspbian kernel.
- With older kernels the adapter works about 10 minutes without a problem,
but after that, the kernel writes an error message to dmesg and no packet is received. Must unplug and plug USB again.
- Tested with and without a powered USB hub.
- i-tec
- i-tec USB 2.0 Ethernet Adapter Fast Ethernet (chip ASIX AX88772B)
- Works out of the box very stable with ASIX kernel driver on latest Raspbian
3.6.11+ (Nov. 2013), Raspberry Pi model B, 256MB RAM.
- Connected through a powered USB hub (may work without it, not tested).
- lsusb output: Bus 001 Device 005: ID 0b95:772b ASIX Electronics Corp.
- Plugable
- Plugable USB2-E100 USB 2.0 10/100 Ethernet adapter
- Works out of the box.
- (ASIX AX88772 chipset)
- Raspberry Pi reboots when you plug it into the USB port,
but after that it works fine.
References