Identity Providers Overview

Overview

In this article, you will learn how Acreto integrates with Identity Providers (like Active Directory or OKTA) to authenticate your users.

Definitions

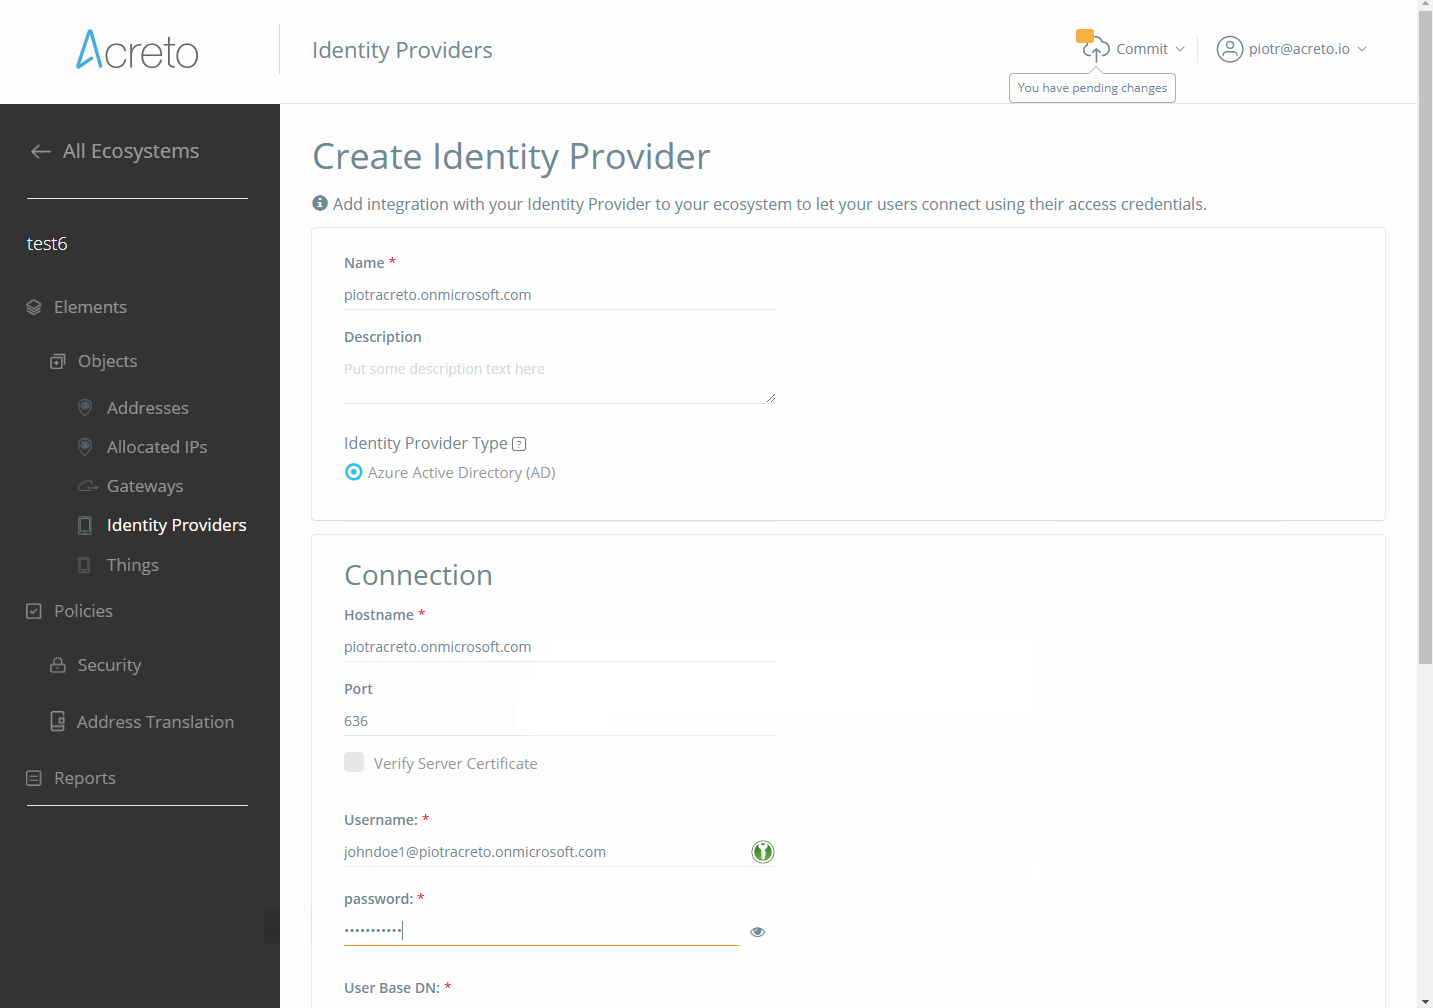
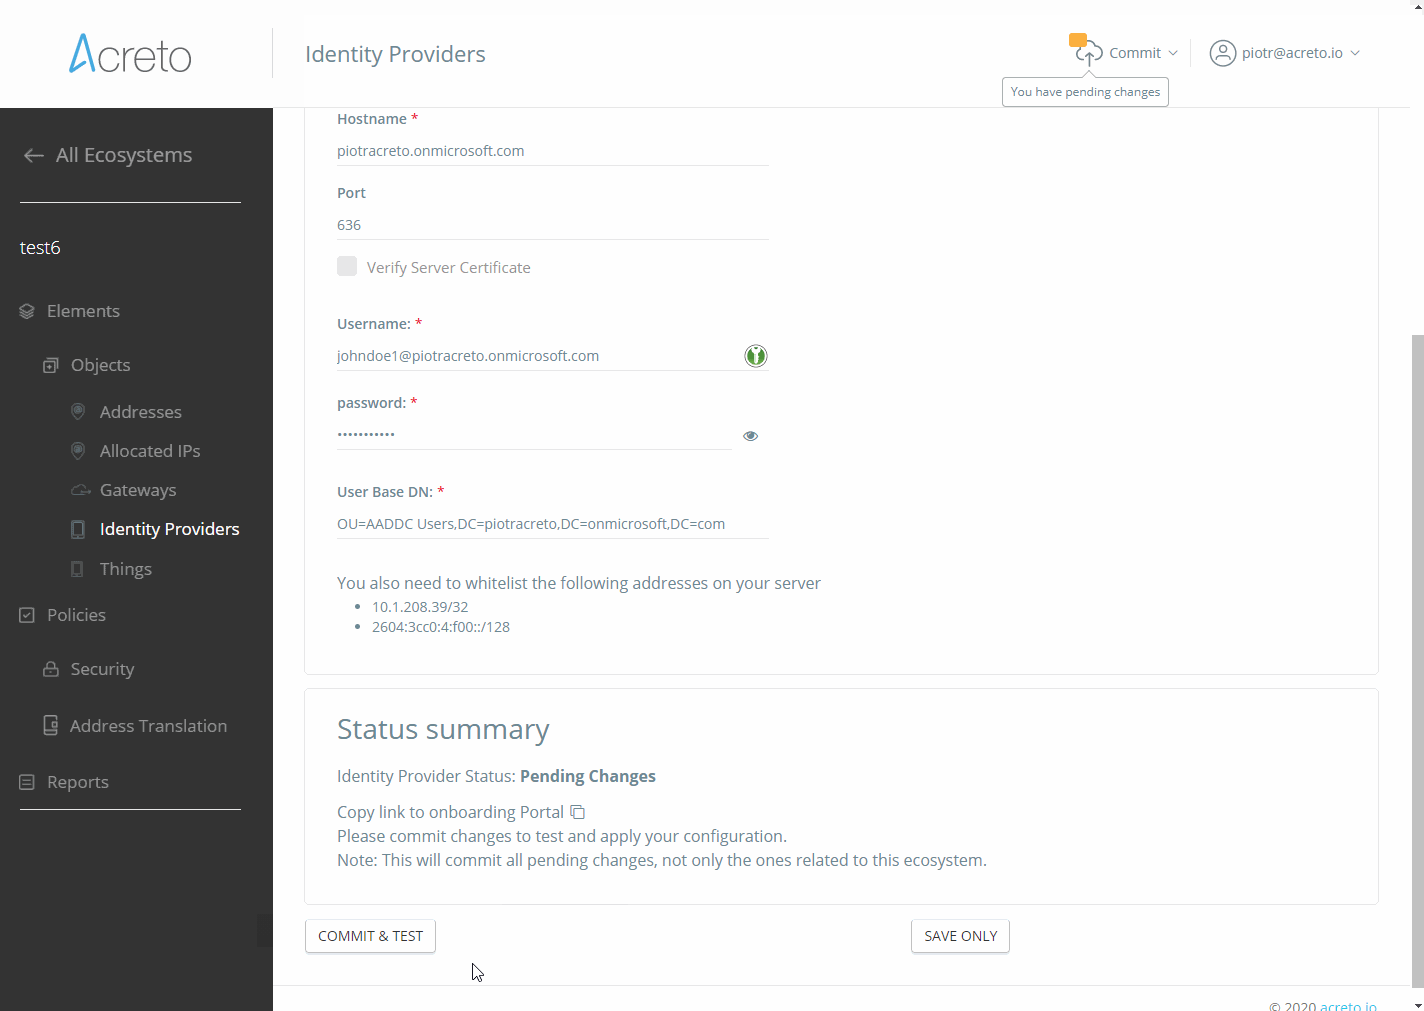
Identity Provider on the Acreto Platform

An Identity Provider is a service that verifies and stores user identity information. Some examples of Identity Providers are:

  • Microsoft Active Directory
  • Okta
  • OpenLDAP

2-Factor Authentication

In addition to an Identity Provider, you might also want to configure a 2-Factor Authentication (2FA) provider.

Using a 2FA provider will require your users to provide more than one type of credential when authenticating; for example, a password (something users know) and a code displayed via mobile phone (something users own).

Benefits of Identity Provider Integration

Integrating an Identity Provider will allow you to:

  • Keep credentials under control with centralized management.
  • Avoid data duplication by storing user data in one place only.
  • Control user data processing to ensure compliance with personal data processing regulations, such as GDPR.
  • Limit risks by managing access to your network based on rules and policies.
  • Disable access of company resources for former partners or employees by removing or limiting access rights in a single place.
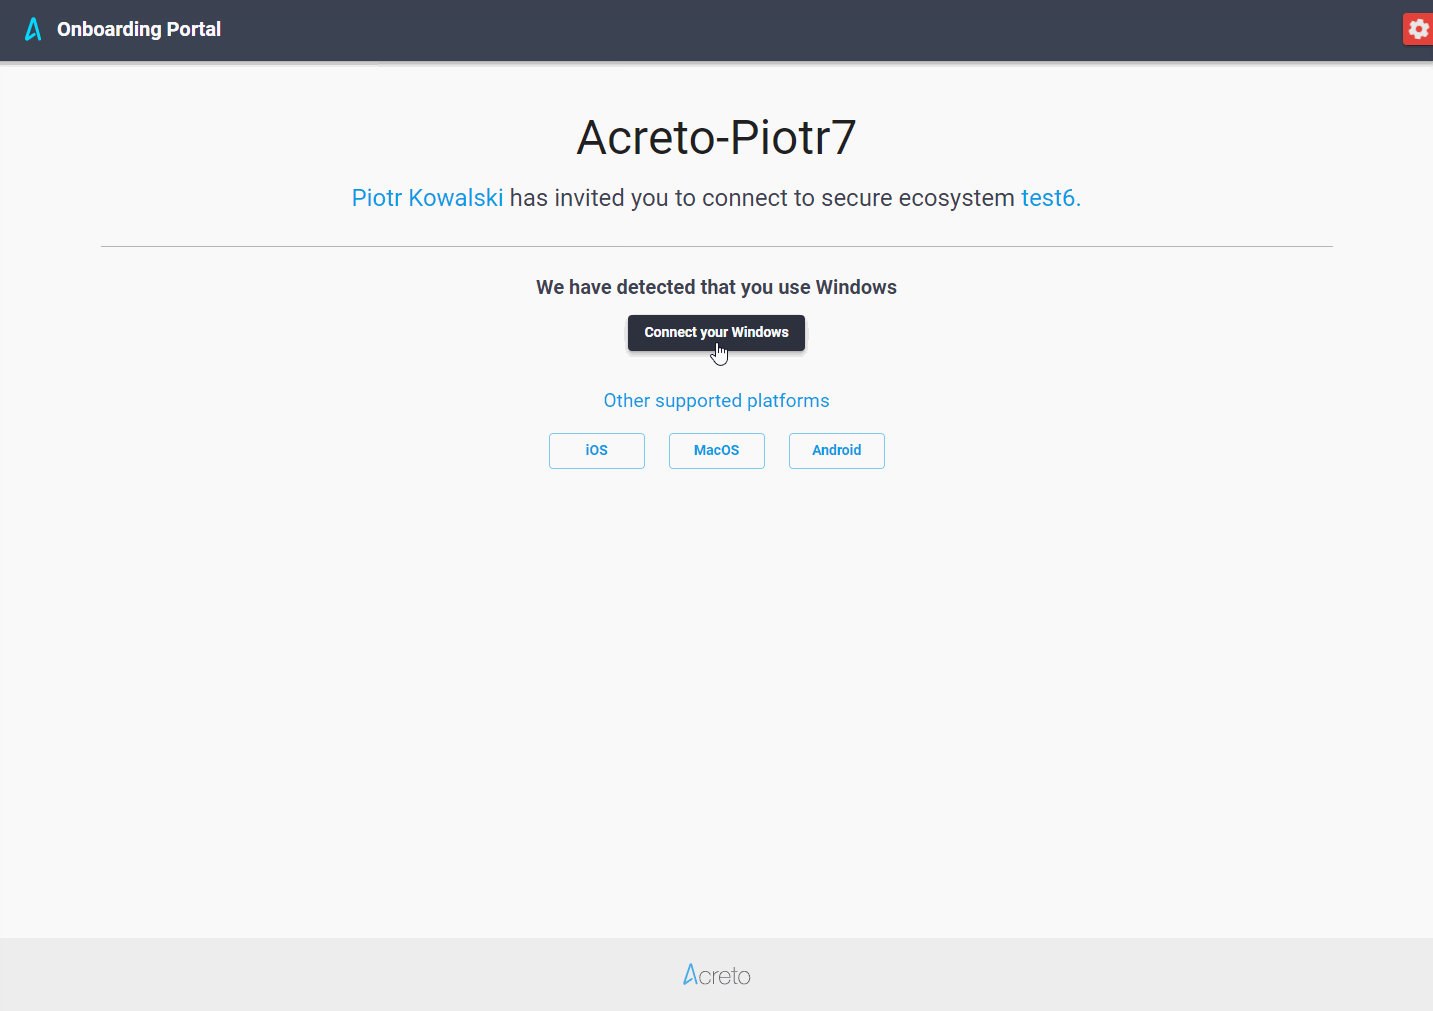
  • Easily Onboard employees and organization members.
  • Connect to the Acreto Ecosystem with the Identity Provider credentials.

How Acreto Uses Identity Providers

Acreto uses Identity Providers to deliver the following features for data plane users:

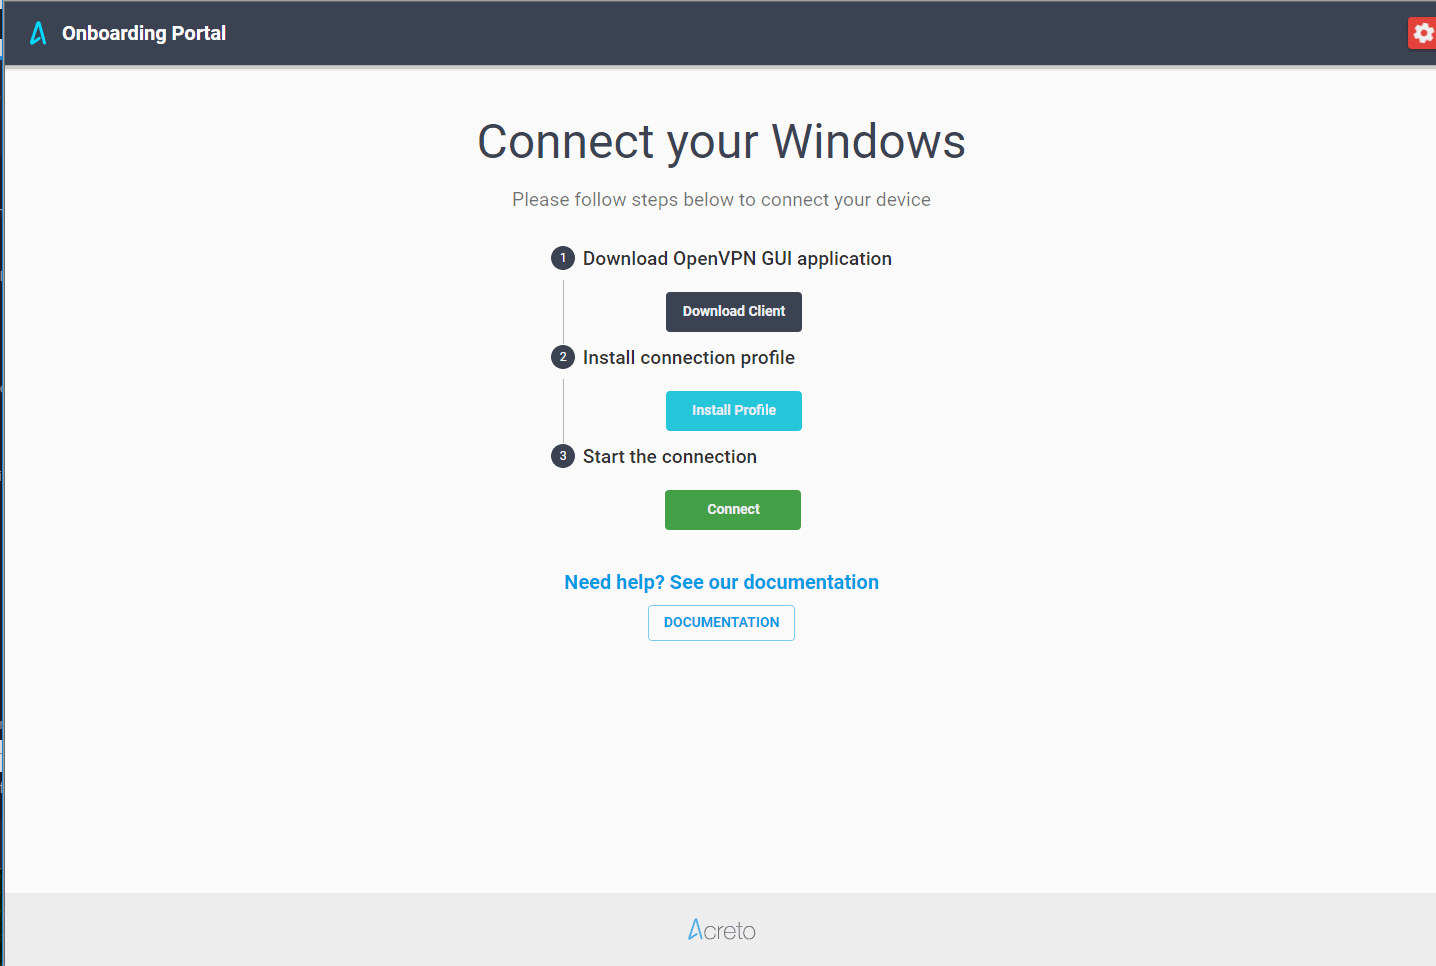
  1. Authentication of users connecting with Acreto TLS-Client and OpenVPN
  2. Ability to send invitation emails to data plane users

Acreto sends a request to the Identity Provider each time it needs to access user information. We only store some anonymized user identity data (for example, in Active Directory it is Guid). We might also cache some user data in memory on a short-term basis.

Identity Providers are only used to authenticate an Ecosystem’s data plane users or while connecting to an Ecosystem with OpenVPN or Acreto TLS-Client.

In this section

Subsections of Identity Providers Overview

How To Integrate Okta LDAP with Server Certificate Verification

Before You Start

Overview

In this article, you’ll learn how to enable your OKTA server certificate verification.

This process involves the following steps:

  1. Downloading server certificate
  2. Converting server certificate from cer to pem format
  3. Uploading server certificate to Acreto Ecosystem

Prerequisites

To set up OKTA LDAP server certificate verification, you will need the following:

  1. Active Acreto Ecosystem
  2. OKTA LDAP server integrated with Acreto Ecosystem

The Purpose of Azure Active Directory Integration

An Azure Active Directory integration allows your Acreto Ecosystem to utilize the user credentials stored in your Active Directory to connect to the Ecosystem using the Acreto TLS Client.

It uses the LDAPS (LDAP Secure) protocol and the Domain Services, which can be deployed on the Azure account to sync with AD passwords.

The LDAPS protocol is used to establish communication between the Acreto Ecosystem and the Azure Active Directory.

Tip

Administrators integrate with a Lightweight Directory Access Protocol (LDAP) directory to streamline the user login process and to automate administrative tasks, such as creating users and assigning roles. An LDAP integration allows the system to use its existing LDAP server as the master source of user data.

Typically, AD integration is also part of a single sign-on implementation.

How To

Configuration of Azure Active Directory

To configure your Azure Active Directory to work with Acreto, please:

  1. Configure secure LDAP for an Azure Active Directory Domain Services managed domain
  2. Enable password synchronization in Azure Active Directory Domain Services
    • If you followed the first tutorial and don’t use on-premises AD the synchronization (between your Azure AD and Azure AD Domain Services) will be enabled by default. However, it is necessary to reset the password of all current users. It can be done by expiring all the existing passwords or resetting them manually from the Azure AD Users View.

Configuration of Acreto Ecosystem

  1. Log in to New or Existing Ecosystem

  2. Create Security Policy

    Create a Security Policy that allows users to connect through your Identity Provider to reach all destinations.

To allow users, employees, or team members (data-plane users) to authenticate in OpenVPN using Azure AD credentials, Acreto offers unique and individual URLs for every Ecosystem portal called Onboarding Portal.

  1. To access the unique URL to that portal, please click on Edit next to the previously added IdP and scroll down.

  2. Then, click on the icon to copy the URL

Frequently Asked Questions

  1. Is an Active Directory included in Office 365 subscription sufficient for the integration?

    No, Office 365 subscription covers only the free Azure Active Directory.

    You need Azure Active Directory Domain Services, which is an additional subscription from Microsoft.

  2. Why is it required to enable password synchronization in Azure Active Directory Domain Services?

    Enable password synchronization in Azure Active Directory Domain Services - As documented in the Microsoft article Tutorial: Configure secure LDAP for an Azure Active Directory Domain Services managed domain:

    Users (and service accounts) can’t perform LDAP simple binds if you have disabled NTLM password hash synchronization on your managed domain.

    Acreto uses LDAP simple binds; therefore NTLM password hash synchronization feature needs to be enabled.

    If you followed the first tutorial and didn’t use on-premises AD, the synchronization (between your Azure AD and Azure AD Domain Services) will be enabled by default. However, it is necessary to reset the password of all current users. It can be done by expiring all the existing passwords or resetting them manually from the Azure AD Users View.

Summary

Thanks to Acreto and Azure Active Directory Identity Provider Integration, users can connect to an Acreto Ecosystem with the same credentials utilized for other internal resources on their network domain.

Also, Acreto Ecosystem Admin(s) can reuse any existing password and security policies. For example, the Active Directory may already have account lockout and password expiration policies.

Active Directory - Azure

Before You Start

Overview

In this article, you’ll learn how to integrate your Azure Active Directory with an Acreto Ecosystem. This process involves the following steps:

  1. Configuration of Azure AD
  2. Configuration of Acreto Ecosystem
  3. Providing an Onboarding Portal link to users
Warning

This feature is currently in beta mode.

Prerequisities

In order to integrate Acreto with Azure Active Directory, you will need:

  1. Active Acreto Ecosystem
  2. Azure Active Directory - Active Subscription is needed - but basic features are free
  3. Azure Active Directory Domain Services - Active Subscription is needed - ~$109.50/month/set

The Purpose of Azure Active Directory Integration

An Azure Active Directory integration allows your Acreto Ecosystem to utilize the user credentials stored in your Active Directory to connect to the Ecosystem using Acreto TLS Client.

It uses the LDAPS (LDAP Secure) protocol and the Domain Services which can be deployed on the Azure account to sync with AD passwords.

The LDAPS protocol is used to establish communication between the Acreto Ecosystem and the Azure Active Directory.

Tip

Administrators integrate with a Lightweight Directory Access Protocol (LDAP) directory to streamline the user login process and to automate administrative tasks, such as creating users and assigning roles. An LDAP integration allows the system to use it’s existing LDAP server as the master source of user data.

Typically, AD integration is also part of a single sign-on implementation.

How Does it Work?

The integration uses the LDAP service account credentials to retrieve the user’s distinguished name (DN) from the LDAP server. Given the user’s DN value, the integration then reconnects with LDAP using the user’s DN and password.

In the diagram below, you can see the communication flow between some Employee (trying to connect to the Ecosystem using Acreto TLS Client), Acreto Ecosystem and Azure AD.

Communication flow between some Employee and Acreto Ecosystem and Azure AD Communication flow between some Employee and Acreto Ecosystem and Azure AD

Info

The integration never stores LDAP passwords on the Ecosystem.

The integration uses a read-only connection that never writes to the Azure Active Directory. The integration only queries for information.

How To

Configuration of Azure Active Directory

To configure your Azure Active Directory to work with Acreto, please:

  1. Configure secure LDAP for an Azure Active Directory Domain Services managed domain
  2. Enable password synchronization in Azure Active Directory Domain Services
    • If you followed the first tutorial and don’t use on-premises AD the synchronization (between your Azure AD and Azure AD Domain Services) will be enabled by default. However it is needed to reset the password of all current users. It can be done by expiring all the current passwords, or resetting them manually from the Azure AD Users View.

Configuration of Acreto Ecosystem

1.Log in to New or Existing Ecosystem

Login Login

  1. Create Security Policy

    Create a Security Policy that allows users to connect through your Identity Provider to reach all destinations.

    Warning

    In beta mode, all users authenticated using Identity Providers belong to default profile group Profile Group 1. This will change in future versions.

    To simplify the initial configuration, we will create a policy that allows all traffic to be passed through the Ecosystem.

    Info

    You should customize the Security Policy to fit your needs once the Identity Provider setup is complete. It should be configured to limit access to network resources for each group (Profile Group).

    Security Policy Security Policy

    Security Policy Security Policy

  2. Add New Identity Provider

    To add a new Identity Provider, select Objects and Identity Providers from the left menu and then click on “Add New”.

    Add IdP Add IdP

    add idp add idp

    Add IdP screenshot 1 Add IdP screenshot 1

    Add IdP screenshot 2 Add IdP screenshot 2

  3. Fill the form with proper values:

    1. Name - descriptive name for this IdP
    2. Description - description of the IdP
    3. Identity Provider Type - in case of AD config choose one of two available options
    4. Host - domian or IP address of your AD server
    5. Port - 636
    6. Username - user that will be used to connection
    7. Password - password for the user account
    8. User Base DN - for Azure AD use OU=AADDC Users, DC=somedomain, DC=onmicrosoft, DC=com, for On-premise Windows Server AD CN=Users, DC=SOMEDOMAIN, DC=com
Tip

Base DN and other values may be specific for your custom configuration. Check proper configuration in the AD control panel.

  1. Save and commit your changes

To allow users, employees or team members VPN users to authenticate in OpenVPN using Azure AD credentials, Acreto offers unique and individual URLs for every Ecosystem portal called Onboarding Portal.

  1. To access the unique URL to that portal, please click on Edit next to previously added IdP and scroll down.

    Onboarding Portal Onboarding Portal

  2. Then, click on the icon to copy the URL.

    Onboarding Portal Onboarding Portal

  3. Now, provide the generated link to your users.

VPN User Experience

When the End User or Employee opens the Onboarding Portal, the Welcome Page will be presented.

The Ecosystem Admin should share this URL with the End Users, ask them to open it, and then follow instructions.

Onboarding screenshot 1 Onboarding screenshot 1

Onboarding screenshot 2 Onboarding screenshot 2

Frequently Asked Questions

  1. Active Directory included into Office 365 subscription sufficient for the integration?

    No, Office 365 subscription covers only the free Azure Active Directory.

    You need Azure Active Directory Domain Services which is an additional subscription from Microsoft.

  2. Why is it required to enable password synchronization in Azure Active Directory Domain Services?

    Enable password synchronization in Azure Active Directory Domain Services - As documented on Microsoft article Tutorial: Configure secure LDAP for an Azure Active Directory Domain Services managed domain:

    Users (and service accounts) can’t perform LDAP simple binds if you have disabled NTLM password hash synchronization on your managed domain.

    Acreto uses LDAP simple binds, therefore NTLM password hash synchronization feature needs to be enabled.

    If you followed the first tutorial and don’t use on-premises AD the synchronization (between your Azure AD and Azure AD Domain Services) will be enabled by default. However it is needed to reset the password of all current users. It can be done by expiring all the current passwords or resetting them manually from the Azure AD Users View.

Summary

Thanks to Acreto and Azure Active Directory Identity Provider Integration, users can connect to an Acreto Ecosystem with the same credentials utilized for other internal resources on their network domain.

Also, Acreto Ecosystem Admin(s) can re-use any existing password and security policies that are already in place. For example, the Active Directory may already have account lockout and password expiration policies.

Active Directory - Windows Server

Overview

In this article, you’ll learn how to integrate your Windows Server Active Directory with an Acreto Ecosystem. This process involves the following steps:

  1. Configuration of Windows Server Active Directory
  2. Configuration of Acreto Ecosystem
  3. Providing an Onboarding Portal link to users

The Purpose of Active Directory Integration

An Active Directory integration allows your Acreto Ecosystem to utilize the user credentials stored in your Active Directory to connect to the Ecosystem using Acreto TLS Client.

The LDAPS protocol is used to establish communication between the Acreto Ecosystem and the Active Directory.

Tip

Administrators integrate with a LDAP (Lightweight Directory Access Protocol) to streamline the user login process and to automate administrative tasks, such as creating users and assigning roles. An LDAP integration allows the system to use it’s existing LDAP server as the master source of user data.

Typically, an AD integration is also part of a single sign-on implementation.

How Does it Work?

The integration uses the LDAP service account credentials to retrieve the user’s distinguished name (DN) from the LDAP server. Given the user’s DN value, the integration then reconnects with LDAP using the user’s DN and password.

In the diagram below, you can see the communication flow between some Employee (trying to connect to the Ecosystem using Acreto TLS Client), Acreto Ecosystem and AD.

%%{init:{"fontFamily":"monospace", "sequence":{"showSequenceNumbers":true}}}%%
sequenceDiagram
    Employee->>Ecosystem:Here is my password.
    Ecosystem->>Azure AD: is Employee's password.
    Azure AD->>Ecosystem: Sure, let the Employee in!
    Ecosystem->>Employee: Welcome!
Info

The integration never stores LDAP passwords on the Ecosystem.

The integration uses a read-only connection that never writes to the Active Directory. The integration only queries for information.

Prerequisite

To complete this procedure, you should:

  1. Have an active and configured Ecosystem.
  2. Have an active Windows Server with installed Active Directory Domain Services.
  3. Have basic knowledge of LDAP protocol.

Configuration of Windows Server Active Directory

Install the “Active Directory Certificate Services” role through Server Manager roles.

  1. On your Windows Server Machine, click on Start –> Server Manager –> Add Roles and Features.
  2. After selecting Add Roles and Features Click on Next.
  3. Choose the Role-based or feature-based installation option and click on the Next button.
  4. Choose Select a server from the server pool option & Select LDAP server from the server pool and click on the Next button.
  5. Choose the Active Directory Certificate Services option from the list of roles and click on the Next button.
  6. Choose nothing from the list of features and click on Next button.
  7. In Active Directory Certificate Services (AD CS) choose nothing and Click on Next button.
  8. Mark Certification Authority from the list of roles and Click on Next button.
  9. Click on Install button to confirm installation.
  10. Now, click on Configure Active Directory Certificate Services on Destination Server option and click on Close button.
  11. We can use the currently logged on user to configure role services since it belongs to the local Administrators group. Click on Next button.
  12. Mark Certification Authority from the list of roles and Click on Next button.
  13. Choose Enterprise CA option and Click on Next.
  14. Choose the Root CA option and Click on the Next button.
  15. Choose to Create a new private key option and click on the Next button.
  16. Choose most recent hasing alhorithm from the list of options. For minimum recommended configuration choose SHA256 as the hash algorithm and Click on Next.
  17. Click on the Next button.
  18. Specify the validity of the certificate choosing Default 5 years and Click on Next button.
  19. Select the default database location and Click on Next.
  20. Click on Configure button to confirm.
  21. Once the configuration succeeded and click on Close button.

Create a certificate template

  1. Go to Windows Key+R and run certtmpl.msc command and choose the Kerberos Authentication Template.
  2. Right-click on Kerberos Authentication and then select Duplicate Template.
  3. The Properties of New Template will appear. Configure the setting according to your requirements.
  4. Go to the General tab and Enable Publish certificate in Active Directory option.
  5. Go to the Request Handling Tab and Enable Allow private key to be exported option.
  6. Go to the Subject Name tab and Enable the subject name format as DNS Name and click on Apply & OK button.

Issue certificate template

  1. Go to Start –> Certification Authority –> Right-click on Certificate Templates –> select New –> Certificate Template to Issue.
  2. Now, select your recently created Certificate Template and click on the OK button.

Request a new certificate for the created certificate template

  1. Go to Windows Key+R –> mmc –> From top menu choose File -> Add/Remove snap-in.
  2. Select Certificates, click on Add button, and then click on the OK button.
  3. Select the Computer account option and click on the Next button.
  4. Select the Local computer option and click on the Finish button.
  5. Now, right click on Certificates select All Tasks and click on Request for new Certificate.
  6. Click on the Next button.
  7. Click on the Next button.
  8. Select your certificate and click on Enroll button.
  9. Click on the Finish button.

Export the created certificate

  1. Right-click on the recently generated certificate and select All tasks –> Export.
  2. Click on the Next button.
  3. Select Do not export the private key option and click on the Next button.
  4. Choose Base-64 encoded X .509 file format and click on Next.
  5. Export the .CER file to your local system path and click on Next.
  6. Click on the Finish button to complete the certificate export.

Configuration of Acreto Ecosystem

  1. Login to New or Existing Ecosystem Login Login

  2. Create Security Policy

    Create a Security Policy that allows users connecting through your Identity Provider to reach all destinations.

    Warning

    In beta mode, all users authenticated using Identity Providers belong to default profile group Profile Group 1. This will change in future versions.

    To simplify initial configuration, we will create a policy that allows all traffic to be passed through the Ecosystem.

    Info

    You should customize the Security Policy to fit your needs once the Identity Provider setup is complete. It should be configured to limit access to network resources for each group (Profile Group).

    Security Policy Security Policy

    Security Policy Security Policy

  3. Add New Identity Provider

    To add a new Identity Provider, select Objects and Identity Providers from the left menu and then click on “Add New”.

    Add IdP Add IdP

  4. Fill the settings with connection details

    add idp add idp

  5. Save and commit your changes

To allow users, employees or team members VPN usersto authenticate in Acreto Connect Client using AD credentials, Acreto offers unique andindividual URLs for every Ecosystem portal called Onboarding Portal.

  1. To access the unique URL to that portal, please click on Edit next to previously added IdP and scroll down. Onboarding Portal Onboarding Portal
  2. Then, click on the icon to copy the URL. Onboarding Portal Onboarding Portal
  3. Now, provide the generated link to your users.

VPN User Experience

When the VPN user opens the Onboarding Portal, the Welcome Page will be presented.

The Ecosystem Admin(s) should share this URL with the VPN Users, ask them to open it and then follow instructions.

The first step of onboarding is to recognize the user’s operating system to provide platform-specified installers and profiles.

Onboarding Portal Onboarding Portal

The second step allows you to download the latest version of Acreto Connect Client and the VPN profile.

Onboarding Portal Onboarding Portal

Summary

Thanks to Acreto and Active Directory Identity Provider Integration, users can connect to an Acreto Ecosystem with the same credentials utilized for other internal resources on their network domain.

Also, Acreto Ecosystem Admin(s) can re-use any existing password and security policies that are already in place. For example, the Active Directory may already have account lockout and password expiration policies.

OKTA

Warning

This feature is currently in Beta.

Introduction

In this article, you’ll learn how to integrate OKTA with an Acreto Ecosystem. The OKTA integration allows your Acreto Ecosystem to utilize the user credentials managed by OKTA to connect to the Ecosystem using Acreto TLS Client.

It uses the LDAPS (LDAP Secure) protocol and the OKTA LDAP Interface which can be deployed on the OKTA account.

Steps

This process involves the following steps:

  1. Enable OKTA LDAP Interface
  2. Configure Acreto Ecosystem
  3. Define Security Policies
  4. Test the integration

How OKTA integration works

The integration uses the LDAP service account credentials to retrieve the user’s distinguished name (DN) from the LDAP server. Given the user’s DN value, the integration then reconnects with LDAP using the user’s DN and password.

In the diagram below, you can see the communication flow between some Employee (trying to connect to the Ecosystem using Acreto TLS Client), Acreto Ecosystem and Azure AD.

sequenceDiagram
    Employee->>Ecosystem: Hello Ecosystem, can I connect? Here is my password.
    Ecosystem->>OKTA LDAP Interface: Hello OKTA, can Employee connect? Here is Employee's password.
    OKTA LDAP Interface->>OKTA API: Let me know if these credentials are correct.
    OKTA API->>OKTA LDAP Interface: Yes, they are.
    OKTA LDAP Interface->>Ecosystem: Sure, let the Employee in!
    Ecosystem->>Employee: Welcome!
Info

The integration never stores users passwords (except the password provided during Identity Provider configuration).

The integration uses a read-only connection that never writes to the OKTA. It only queries for information.

Limitations

  1. All authentication requests originate from Acreto Ecosystem addresses. Therefore, it’s not possible to implement granular network-based access control on OKTA. See relevant article in OKTA documentation.

  2. We recommend using OKTA Verify Push Verification method for multifactor authentication. If you want to use other methods, see Use multifactor authentication with the LDAP Interface.

Prerequisities

To proceed with setting OKTA for Acreto Ecosystems, you need:

  1. OKTA account with admin rights
  2. Create and login to Acreto Ecosystem

You should also be familiar with:

  1. Acreto Identity Providers Overview
  2. OKTA documentation: Set up and manage the LDAP Interface

How To

Step 1: Enable OKTA LDAP Interface

To configure your OKTA account, you need to enable the OKTA LDAP Interface. Please go through the following procedures:

  1. Enable OKTA LDAP Interface
  2. Read OKTA LDAP configuration details:
    1. In the Admin Console, go to Directory(1) > Directory Integrations(2).
    2. Select LDAP Interface(3)
    3. Note displayed information
  3. Create OKTA Third-Party Administrator account with read-only administrator role. This administrator account will be used by Acreto Ecosystem to authenticate with OKTA.
Tip

Ensure that created Third-Party Administrator account will not be challenged with OKTA Multifactor Authentication for requests originating from your Ecosystem IP addresses. You also need to whitelist the following addresses on your server section of the Identity Provider creation page in step 2.

Step 2: Configuration of Acreto Ecosystem

  1. Add New Identity Provider

    To add a new Identity Provider:

    1. Select Objects and Identity Providers from the left menu.
    2. Click on “Add New”.
    3. Fill in the following information:
      1. Name and Description
      2. Host, User Base DN, Group Base DN - as provided on OKTA LDAP Interface settings screen
      3. Username and Password - credentials of the OKTA Third-Party Administrator account created in step 1
    4. Save your changes.
  2. Create Security Policy to allow traffic sent by your users

    When you create a new Identity Provider, a new Profile Group is created with a name containing Identity Provider name, for example: Identity Provider LDAP001 (fa45). By default, all users authenticated with this Identity Provider are assigned to that Profile Group.

    To allow traffic from your users using that Identity Provider, select this Profile Group in the Source field of Security Policy. For detailed instructions on creating a Security Policy, see Create first security policy.

  3. Commit your changes

Step 3: Testing

To test the integration:

  1. Generate Onboarding Portal Link
  2. Open generated Onboarding Portal Link and follow the instructions
  3. Connect to your ecosystem providing username and password managed by OKTA

To get more information about end-user onboarding experience, see onboarding documentation

Next steps

  1. Customize your security policies
  2. Define mappings of LDAP groups to Identity Provider groups
  3. Send invitations to your users

Summary

Thanks to Acreto and OKTA Identity Provider Integration, users can connect to an Acreto Ecosystem with the same credentials utilized for other internal resources on their network domain.

See also

  1. OKTA documentation:Set up and manage the LDAP Interface

Generic LDAP

Before You Start

Overview

In this article, you’ll learn how to integrate your LDAP with an Acreto Ecosystem. The described procedure is universal for all LDAP services and requires knowledge about connection details. If you search for a platform-specific guide, read articles about Active Directory - Azure or Active Directory - Windows Server.

In this article, we will use Okta as a free LDAP provider.

Prerequisites

To integrate Acreto with the LDAP provider, you will need the following:

  1. Active Acreto Ecosystem
  2. Connection detail to connect with LDAP provider service.

The Purpose of LDAP

An LDAP integration allows your Acreto Ecosystem to utilize the user credentials stored in your LDAP to connect to the Ecosystem using the Acreto TLS Client.

We recommended using the LDAPS version of the protocol to establish communication between the Acreto Ecosystem and the LDAP service. LDAPS is a secured protocol version; any modern LDAP service provider should support that.

Tip

Administrators integrate with an LDAP (Lightweight Directory Access Protocol) directory to streamline the user login process and to automate administrative tasks, such as creating users and assigning roles. An LDAP integration allows the system to use it’s existing LDAP server as the master source of user data.

Typically, LDAP integration is also part of a single sign-on implementation.

How Does it Work?

The integration uses the LDAP service account credentials to retrieve the user’s distinguished name (DN) from the LDAP server. Given the user’s DN value, the integration reconnects with LDAP using the user’s DN and password.

The diagram below shows the communication flow between some Employees (trying to connect to the Ecosystem using Acreto TLS Client), Acreto Ecosystem, and LDAP.

sequenceDiagram
    Employee->>Ecosystem: Here is my password.
    Ecosystem->>LDAP: Here is Employee's password.
    LDAP->>Ecosystem: Sure, let the Employee in!
    Ecosystem->>Employee: Welcome!
Info

The integration never stores LDAP passwords on the Ecosystem.

The integration uses a read-only connection that never writes to the LDAP. The integration only queries for information.

How To

Configuration of LDAP Provider

To configure your LDAP to work with Acreto, please:

  1. Log in to the LDAP user management dashboard to ensure that at last one user is added. Users in LDAP Users in LDAP
  2. Prepare the connection credentials:
    1. Base DN - text description of LDAP structure Base DN for Okta Base DN for Okta
    2. Binding User - username and password of the account used to authorize the connection between Acreto and LDAP

Configuration of Acreto Ecosystem

  1. Log in to New or Existing Ecosystem Login Login

  2. Create Security Policy Create a Security Policy that allows users to connect through your Identity Provider to reach all destinations.

    To simplify the initial configuration, we will create a policy that allows all traffic to be passed through the Ecosystem.

    Info

    It would be best to customize the Security Policy to fit your needs once the Identity Provider setup is complete. It should be configured to limit access to network resources for each group (Profile Group)

    Security Policy Security Policy

  3. Add New Identity Provider

    To add a new Identity Provider, select Objects and Identity Providers from the left menu and click “Add New”.

    Add IdP Add IdP

  4. Fill the form with proper values:

    1. Name - descriptive name for this IdP
    2. Description - description of the IdP
    3. Identity Provider Type - in the case of AD config, choose one of two options Basic configuration Basic configuration
    4. Host - domain or IP address of your AD server
    5. Port - 636
    6. Username - user name used to connect
    7. Password - password for the user account
    8. User Base DN - for Okta LDAP use ou=users, dc=ACCOUNT-ID, dc=okta, dc=com. Connection details Connection details
Tip

Base DN and other values may be specific to your custom configuration. Check proper configuration in the LDAP provider knowledge base.

  1. Save and commit your changes.

To allow users, employees, or team members VPN users to authenticate in Acreto Connect Client using LDAP credentials, Acreto offers unique and individual URLs for every Ecosystem portal called Onboarding Portal.

  1. To access the unique URL to that portal, please click on Edit next to the previously added IdP and scroll down.

    Onboarding Portal Onboarding Portal

  2. Then, click on the icon to copy the URL.

    Onboarding Portal Onboarding Portal

  3. Now, provide the generated link to your users.

End User Experience

When the End User or Employee opens the Onboarding Portal, the Welcome Page will be presented.

The Ecosystem Admin should share this URL with the End Users, ask them to open it, and follow the instructions.

Onboarding screenshot 1 Onboarding screenshot 1

Onboarding screenshot 2 Onboarding screenshot 2

Summary

Thanks to Acreto and LDAP providers, users can connect to an Acreto Ecosystem with the same credentials utilized for other internal resources on their network domain.

Also, Acreto Ecosystem Admin(s) can reuse any existing password and security policies that are already in place. For example, the LDAP provider may already have account lockout and password expiration policies.